Saturday 28 April 2018
Thursday 27 April 2017
Sunday 9 April 2017
Tuesday 4 April 2017
Friday 18 November 2016
Wednesday 5 October 2016
How to tell if your Galaxy Note7 is safe to use
How to tell if your Galaxy Note7 is safe to use

Samsung has created specific box markings and an IMEI lookup tool so you can tell if you have a non-explosive model.


Samsung is offering detailed plans for how you’ll be able to tell the difference between a faulty Note7 or one that’s safe to use.
Big blue S
The company says the new barcode features a white sticker with a large, blue “S” at the top right corner and a small, black square on the bottom. If your Note7 box has the big blue "S", it should be safe.

Look for the new label on the safe versions of the Galaxy Note7.
Check your IMEI
A Samsung recall site also has a tool to lookup a phone’s IMEI number so you can certify that a new phone is safe. You probably don’t need to double check if you’ve been an issued an official recall by Samsung, but this will be important later on as people begin to resell and trade around devices.
Green status bar
What's more, Samsung has confirmed to ZDNet that the new, safe Note7 units will feature a green battery icon in the status bar, instead of the usual white.
What about refurbished phones?
We’ve also yet to hear what Samsung plans to do with the glut of phones it’s bound to receive since the recall extends to every single Note7 purchased. The company said the problem is with the battery itself. The following statement from Ars Technica says, “Based on our investigation, we have learned that there was an issue within the battery cell. An overheating of the battery cell occurred when the anode-to-cathode came into contact which is a very rare manufacturing process error.”
So it’s possible there could be some massive fire sale later on of refurbished models, but we haven’t had any indication of how that will turn out, or how you'll be able to tell if a refurbished phone is safe.
Tuesday 4 October 2016
10 Tips and Tricks for Google Maps On Android
10 Tips and Tricks for Google Maps On Android
Today we are here with some amazing tips and tricks for Android Google Maps app that you might not have tried till now, these tricks will help you in navigation and automating your routing tasks with great ease and also some of the additional features that you don’t even know these app can do.
Google Maps is one of the best navigation services that you can ever find on the internet as through this service, one can easily find up the most accurate locations of nearby hotels, laundries, parks, restaurants, stations and much more easily. With all its features, you can also remain updated about the routes and the places and not only that, you can also do all that at very high speed ( It matters a lot ). Although till now the Google maps is full of all the needed potential that anyone can tend to get from any navigation service but still you can try to boost it’s valued to another level so as to get more and more out of it much easily. You can put on some tricks and tips to boost up the Google Maps on Android and get out more benefits from this service, to know about some of the best tricks and tips for Google Maps on Android head towards the article given below.
10 Tips and Tricks for Google Maps On Android
Below is the collection of all the tips and tricks that you need to do in you Android mobile to get more out of Google maps app on your device.
1 Adding Multiple Stops to your Route
You can use the Maps to enter your current location and your destination and the Google Maps will automatically get up the route for your destination. If you want to go through some alter ways or through some fluctuated way out then you can also reorder your route by using up the three-dot menu and then selecting the hamburger icon under it. Drag and rearrange your route after that.
2 Get on Street View
Long tap on the location which you want to see in street view while using Google Maps on mobile devices, then tap once on the card menu that appears below on the screen and then choose up the location picture. The street view can actually give you more detailed look of the place and hence help you lots to find your exact destination.
3 Send directions (PC to Phone)
Sign into your Google Account on your PC and then open up the Google Maps, find up the directions for your route or for any place and then from the options on the card menu you can send up that particular route to your mobile device by clicking on ” Send to Device”. You know that moving through Maps feel lots easier on PC’s big screen than on smartphone so you can use this feature to find the exact route and location of any place and then send all that data to your smartphone’s Google Maps.
#4 Use Google Now Commands
While driving up your car you may find it very difficult to keep in touch with the Google Maps on your smart device (if your car doesn’t have GPS, Maps) as you cannot give it up the commands. But there is the thing that can make your task much easier, just speak up the Google Now commands to the Google Maps on your mobile device and it will follow these all.
Supported commands:
“Avoid Tolls”
“Avoid Highways”
“Avoid ferries”
“Allow …above things”
“Find Gas Stations”
“Show Alternate Routes”
#5 Use Maps Offline
You know that you can easily download up to the loaded maps for using in-network ban conditions or for much fast and flexible surfing as nothing can be fast than offline browsing. So just download up to the map for your route and then access it offline, you can save lots of time by doing so.
#6 Track Visited Locations
While using up the Google Maps it constantly traces your visited locations and saves them to your timeline. This could be very helpful for you too if you get lost in the middle of the route while going to your destination. To recheck your visited places go to your timeline from the hamburger menu (slide it from the left edge of the screen).
#7 Zoom Easily
zooming i
6 Awesome Apps By Google You Probably Never Heard Of
6 Awesome Apps By Google You Probably Never Heard Of
Lets have a look on 6 Awesome Apps by Google You Probably never Heard Of and using these apps on your android mobile you will definately get the great experience, So have a look on all these apps below.
Google is one of the leading manufacturers of software, apps as we all know and it makes great software that couldn’t be misunderstood ( Android is also made and developed by Google ). You could have found some great apps for your smartphones running on Android or iOS that all are made by Google but still there are some more great apps by Google that you probably might have never heard of. These great apps made for Android and iOS by the Google are just tremendous and you will also love to use them on your devices. Here in this article, we have listed those best awesome apps by the Google that you might have never used before or even heard of. Just read up the whole article and know more about them.
6 Awesome Apps By Google You Probably Never Heard Of
Below we had listed some of the best apps that you will surely love to try, but you must not have heard about them till now. So have a look on these apps below.
1 Google Duo
This could be either stated as the best Video calling app or the simplest one because it is not loaded with so many functions but only the support for just video calling. Anyone who needs to do a video calling will have to click up the Big video call button, choose up the contacts and then go for the calling. This can be the best app for video calling because while doing video calls no one may want any bunch of functions except just noninterupted calling, the nontech-savvy people can find it much more usable than any other app of the same kind. There is one amazing preview feature of this app with which users can actually see up the caller on their screen even before picking up the call hence can easily identify the caller. This app can be used to call on both Android as well as iOS and even the cross-platform functinality is possible.
#2 Snapseed
This one is the most powerful photo editing app that you can ever find for your devices, this app resembles the potential qualities of the desktop versions of image editors hence you could imagine it’s real power. Not only that but this app has a great UI too which makes it easier to work with different tools and the images. You get in some great image editing capabilities with this app like cropping, rotating, image tuning, add text, brushes, healing etc and apart from that all you get a huge number of filters that you can apply to your images.
#3 Androidify
This is something that you will really love! This app is really awsome, users just can play up with many different aspects of an Android green bot like body and then convert into an image which is the exception and you made that for some purpose. Make up multiple changes from the list of various styles for everything like changing up the clothes color, adding accessories etc and much more to create a great image of a character that you can actually share with the social media users.
#4 Google Gesture Search
Till now you might have used up with some few gestures on your Android devices and you get limited to apps or some settings for which you can actually set up the gestures. But now after installing up the Google Gesture Search app on your device you can easily search for about everything inside your device like apps, files, settings etc just through gestures that you can set up before in the app settings.
#5 Google Fit
This could not be the best fitness-related app but still is the simplest and the coolest ever app that you can find for your device. Through the easy to surf interface of this app one can keep up the look of all possible fitness related information and the app also provide the users with the guidelines and tips so that the users can grow up much faster on their tracks or the practice routines.
10 Tips and Tricks for Google Maps On Android
10 Tips and Tricks for Google Maps On Android
Today we are here with some amazing tips and tricks for Android Google Maps app that you might not have tried till now, these tricks will help you in navigation and automating your routing tasks with great ease and also some of the additional features that you don’t even know these app can do.
Google Maps is one of the best navigation services that you can ever find on the internet as through this service, one can easily find up the most accurate locations of nearby hotels, laundries, parks, restaurants, stations and much more easily. With all its features, you can also remain updated about the routes and the places and not only that, you can also do all that at very high speed ( It matters a lot ). Although till now the Google maps is full of all the needed potential that anyone can tend to get from any navigation service but still you can try to boost it’s valued to another level so as to get more and more out of it much easily. You can put on some tricks and tips to boost up the Google Maps on Android and get out more benefits from this service, to know about some of the best tricks and tips for Google Maps on Android head towards the article given below.
10 Tips and Tricks for Google Maps On Android
Below is the collection of all the tips and tricks that you need to do in you Android mobile to get more out of Google maps app on your device.
1 Adding Multiple Stops to your Route
You can use the Maps to enter your current location and your destination and the Google Maps will automatically get up the route for your destination. If you want to go through some alter ways or through some fluctuated way out then you can also reorder your route by using up the three-dot menu and then selecting the hamburger icon under it. Drag and rearrange your route after that.
2 Get on Street View
Long tap on the location which you want to see in street view while using Google Maps on mobile devices, then tap once on the card menu that appears below on the screen and then choose up the location picture. The street view can actually give you more detailed look of the place and hence help you lots to find your exact destination.
3 Send directions (PC to Phone)
Sign into your Google Account on your PC and then open up the Google Maps, find up the directions for your route or for any place and then from the options on the card menu you can send up that particular route to your mobile device by clicking on ” Send to Device”. You know that moving through Maps feel lots easier on PC’s big screen than on smartphone so you can use this feature to find the exact route and location of any place and then send all that data to your smartphone’s Google Maps.
#4 Use Google Now Commands
While driving up your car you may find it very difficult to keep in touch with the Google Maps on your smart device (if your car doesn’t have GPS, Maps) as you cannot give it up the commands. But there is the thing that can make your task much easier, just speak up the Google Now commands to the Google Maps on your mobile device and it will follow these all.
Supported commands:
“Avoid Tolls”
“Avoid Highways”
“Avoid ferries”
“Allow …above things”
“Find Gas Stations”
“Show Alternate Routes”
#5 Use Maps Offline
You know that you can easily download up to the loaded maps for using in-network ban conditions or for much fast and flexible surfing as nothing can be fast than offline browsing. So just download up to the map for your route and then access it offline, you can save lots of time by doing so.
#6 Track Visited Locations
While using up the Google Maps it constantly traces your visited locations and saves them to your timeline. This could be very helpful for you too if you get lost in the middle of the route while going to your destination. To recheck your visited places go to your timeline from the hamburger menu (slide it from the left edge of the screen).
#7 Zoom Easily
zooming i
HOW TO HACK WI-FIGet Anyone's Wi-Fi Password Without Cracking Using Wifiphisher
HOW TO HACK WI-FIGet Anyone's Wi-Fi Password Without Cracking Using Wifiphisher


Welcome back, my tenderfoot hackers!
Do you need to get a Wi-Fi password but don't have the time tocrack it? In previous tutorials, I have shown how to crack WEP,WPA2, and WPS, but some people have complained that cracking WPA2 takes too long and that not all access points have WPS enabled (even though quite a few do). To help out in these situations, I present to you an almost surefire way to get a Wi-Fi password without cracking—Wifiphisher.
Steps in the Wifiphisher Strategy
The idea here is to create an evil twin AP, then de-authenticate or DoS the user from their real AP. When they re-authenticate to your fake AP with the same SSID, they will see a legitimate-looking webpage that requests their password because of a "firmware upgrade." When they provide their password, you capture it and then allow them to use the evil twin as their AP, so they don't suspect a thing. Brilliant!
To sum up, Wifiphisher takes the following steps:
De-authenticate the user from their legitimate AP.Allow the user to authenticate to your evil twin.Offer a webpage to the user on a proxy that notifies them that a "firmware upgrade" has taken place, and that they need to authenticate again.The Wi-Fi password is passed to the hacker and the user continues to the web oblivious to what just happened.
Similar scripts have been around for awhile, such as Airsnarf, but this new Wifiphisher script is more sophisticated. In addition, you could always do this all manually, but now we have a script that automates the entire process.
To do this hack, you will need Kali Linux and two wireless adapters, one of which must be capable of packet injection. Here, I used the tried and true, Alfa AWUS036H. You may use others, but before you do, make certain that it is compatible with Aircrack-ng(packet injection capable). Please do NOT post questions on why it doesn't work until you check if your wireless adapter can do packet injection. Most cannot.
Now let's take a look at Wifiphisher.
Step 1Download Wifiphisher
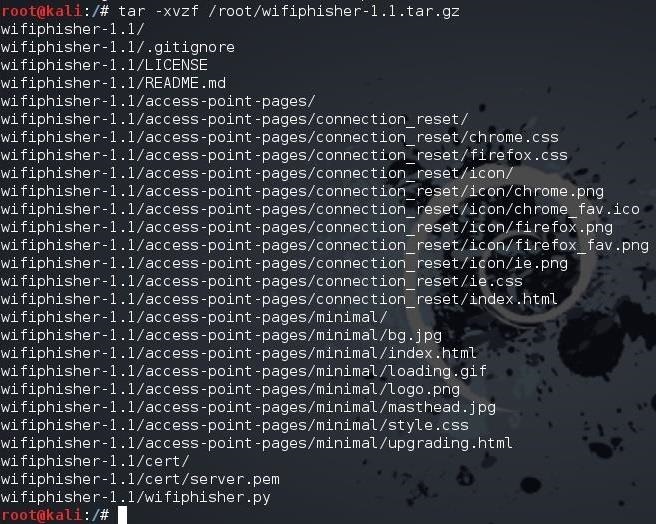
To begin, fire up Kali and open a terminal. Then download Wifiphisher from GitHub and unpack the code.
kali > tar -xvzf /root/wifiphisher-1.1.tar.gz
As you can see below, I have unpacked the Wifiphisher source code.

Alternatively, you can clone the code from GitHub by typing:
kali > git clone https://github/sophron/wifiphisher
Step 2Navigate to the Directory
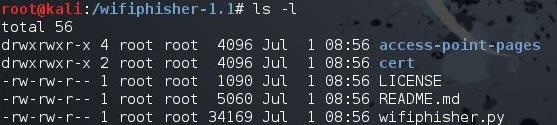
Next, navigate to the directory that Wifiphisher created when it was unpacked. In my case, it is /wifiphisher-1.1.
kali > cd wifiphisher-.1.1
When listing the contents of that directory, you will see that the wifiphisher.py script is there.
kali > ls -l

Step 3Run the Script
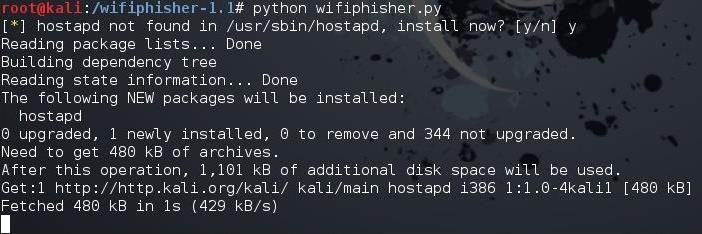
You can run the Wifiphisher script by typing:
kali > python wifiphisher.py
Note that I preceded the script with the name of the interpreter, python.

The first time you run the script, it will likely tell you that "hostapd" is not found and will prompt you to install it. Install by typing "y" for yes. It will then proceed to install hostapd.

When it has completed, once again, execute the Wifiphisher script.
kali > python wifiphisher.py
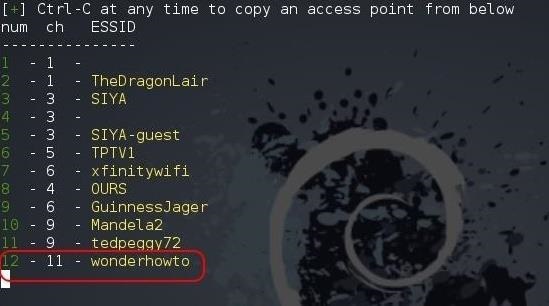
This time, it will start the web server on port 8080 and 443, then go about and discover the available Wi-Fi networks.

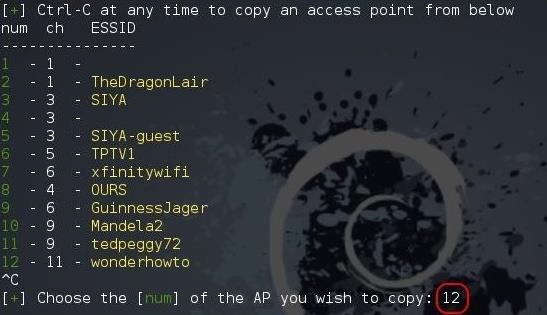
When it has completed, it will list all the Wi-Fi networks it has discovered. Notice at the bottom of my example that it has discovered the network "wonderhowto." That is the network we will be attacking.

Step 4Send Your Attack & Get the Password
Go ahead and hit Ctrl + C on your keyboard and you will be prompted for the number of the AP that you would like to attack. In my case, it is 12.

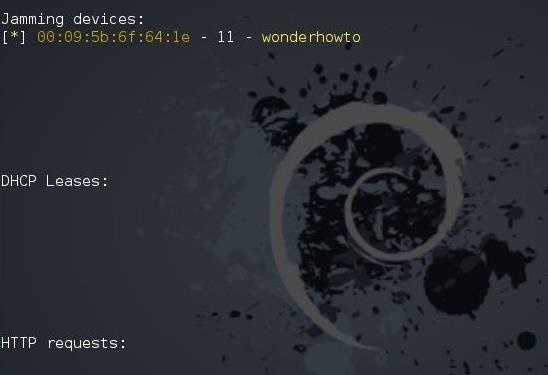
When you hit Enter, Wifiphisher will display a screen like the one below that indicates the interface being used and the SSID of the AP being attacked and cloned.

The target user has been de-authenticated from their AP. When they re-authenticate, they will directed to the the cloned evil twin access point.
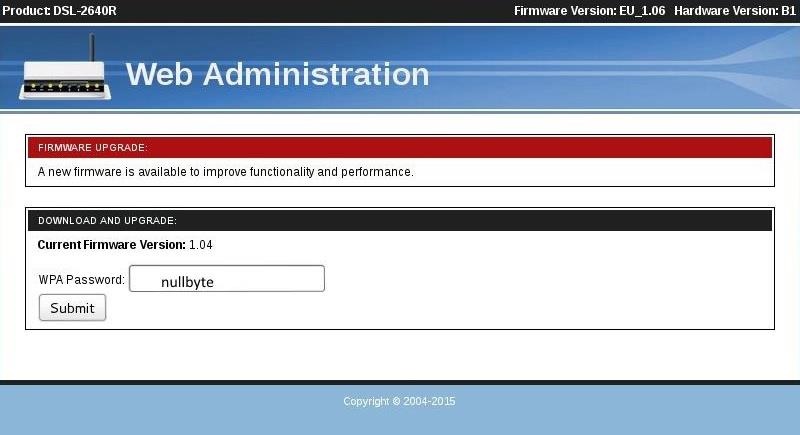
When they do, the proxy on the web server will catch their request and serve up an authentic-looking message that a firmware upgrade has taken place on their router and they must re-authenticate.

Notice that I have put in my password, nullbyte, and hit Submit.
When the user enters their password, it will be passed to you through the Wifiphisher open terminal, as seen below. The user will be passed through to the web through your system and out to the Internet, never suspecting anything awry has happened.

Now, my tenderfoot hackers, no Wi-Fi password is safe! Keep coming back as explore more of the world's most valuable skill set—hacking!
Monday 3 October 2016
4 Tips to Capture Documents Without Getting Shadows
4 Tips to Capture Documents Without Getting Shadows

It is annoying when there are some shadows on scanned documents. So today we’d like to share some ways to solve this problem. Follow the tips below and most of the shadows can be avoided.
1. Ensure adequate lighting when capturing documents.
Enough lighting is the most important factor for avoiding shadows. So make sure that your documents are captured in the environment with full and even light.
For example, you can make full use of daylight because natural lighting is most effective in improving illumination. Furthermore, if it is available, try to use multiple light sources by mixing direct and reflected light.
2. Find the best viewing angle.
Take pictures toward the light instead of against the light. Shadows of your hands and body will be projected on the document when you capture it against the light.
3. Use the flash.
When capturing documents in low light, you may try to use the flash in the app.
On the document shooting page, tap the icon in the upper left corner then you can manually turn on or turn off the flash. And you can also choose Auto or Torch mode for the flash.
4. Timely preview your scans.
We added the preview feature for both single and batch scan mode since version 3.4. So users can timely preview the scan qualities. This helps users to find the problems and make better scans before saving it.
Have you found any nice ways to avoid image shadows? Come and share with us!
Thursday 29 September 2016
Tips and tricks to get more on Samsung Galaxy S5....
The Samsung Galaxy S5 is a big phone, both physically and figuratively. Packed within its slightly boring plastic shell is mega-powerful hardware running the latest and greatest software from the world’s top Android manufacturer. When a phone has as many features as this one, figuring out where everything is and how it works can be a little daunting.
Samsung’s TouchWiz Android skin used to be horrific, but has improved quite a lot. All you need is a little primer on where all the best stuff is hiding and what features are worth your time. These tips will help you make the most of your shiny new GS5.
Sort the app drawer
The default arrangement for the Galaxy S5 app drawer is alphabetical, but you can set it to group apps however you like. Tap the menu button in the corner and change View as to custom. That menu also lets you create folders in the app drawer for better organization.
Toolbox

The Toolbox is one of those feature that makes a ton of sense, but isn’t very prominent, all tucked away in the settings menu. This is a floating icon (think: Facebook chat head) that opens a list of customizable app shortcuts. It can be toggled on and off with the button you find in the expanded notification in the notifications drawer. You can configure which apps are listed in the main system settings for the Toolbox under Sound and Display.
OK Google...
The updated TouchWiz home screen has Google voice search hot-word detection built right in. If you can see the search bar, you can say “OK Google” to launch the voice interface. Tell your phone who you want to call or text, or ask it common questions to get search results or Google Now cards. It’s almost identical to stock Android devices.
Register fingerprints for better accuracy

The Galaxy S5 fingerprint reader is a little finicky, but setting up your prints correctly goes a long way toward improving accuracy. You get eight swipes to register each print, but don’t just hold your finger straight up and down every time. Tilt a little bit side-to-side several times so the phone learns what the patterns look like in those directions too.
Kill S Voice
It’s strange that S Voice still exists, considering the more prominent role for Google’s own voice function on the Galaxy S5’s home screen. S Voice is still hidden behind a double-press of the home button, but that comes at a cost: after a single press of the home button, the phone will delay briefly to wait and see if you’re going to press it again it to activate S Voice. Yeah, not likely, Samsung. Get rid of the delay by going into the S Voice app settings and disable the option to wake up via the home button.
One-handed mode

Being a big phone, one-handed operation can sometimes be an issue with the Galaxy S5. To help with that, head into the main system settings and find One-handed operation under Sound and Display. Once enabled, you can toggle it on with a quick edge gesture—swipe in from the edge of the screen toward the middle and back out again. The screen shrinks down toward the lower right corner, making it easier to reach everything.
High screen sensitivity
Buried in the settings is an option to make Galaxy S5 owners in colder climates very happy in the winter. High screen sensitivity mode lets you use the device with regular gloves on (rather than those special touchscreen gloves). This feature can be found in the Display sub-menu, or a few rows down in the notification toggles.
Ultra power saving mode

You need not fear a dead battery when you’re away from the charger with a nearly empty Galaxy S5—the new Ultra power saving mode can give you substantially more standby time by shutting off CPU cores, blocking background tasks, and flipping the screen to a delicious retro black and white theme. The toggle for Ultra Power Saving Mode is in the notification area, but you’ll want to check it out and get your apps set up before you need it.
Separate home and lock screen wallpaper
Many Android devices just use your home screen wallpaper on the lock screen, but Samsung offers you the option to set these individually. Check the Settings for the Wallpaper item and then select home screen, lock screen, or both from the menu before picking an image.
Disable built-in apps

Both Samsung and your carrier have been kind enough to include some non-removable apps that you’ll probably never use—thanks, guys. While you can’t truly delete them, you can at least disable them so they don’t show up in the app drawer or run in the background. Head to the Application Manager in settings and swipe over to the All Apps tab. Open the info screen for any app you want to silence and tap Turn off.
Alternately, you can long-press on an icon in the app drawer, and drag it up to the “Disable” link at the top of the screen.
To re-enable any of these apps, go to Settings > Applications >Application Manager and look for the Turned off column on the far right.
S Finder
The notification shade in TouchWiz is graced by two new, non-removable buttons, one of which is S Finder. This one is actually a pretty useful universal search app that finds matching apps, calendar appointments, browsing history, bookmarks, contacts, messages, files, settings, and more. It’s a great way to find that sneaky hidden setting buried 4 sub-menus deep. You might as well make use of it.
Customize notification toggles

The handy buttons at the top of the notification shade might not contain all the settings you want, but that’s no problem for someone like you who had the good judgment to buy a Galaxy S5. To customize these buttons, open the expanded toggle list with the button in the upper right corner, then tap the edit button in that same area. From this menu you can drag the buttons around so the ones you use most are easily accessible.
Newsletter
Get the latest news, trends, apps, and tips for your Android phone.
Get our Greenbot download newsletter
Go
Blocking mode
That drunk phone call from your idiot friends at 2 in the morning will never again trouble you after setting up this feature. Just openBlocking Mode under Personalization in the main system settings, and decide what kinds of notifications you want to block—calls, alarms, or all notifications. Now you won’t be bothered during your quiet hours unless you get a call from a favorite contact.
Disable My Magazine

Samsung’s My Magazine is basically a Flipboard widget that takes up a whole home screen panel. Even if that sounds neat, it’s ridiculously slow. If you want to turn it off, just long-press on the home screen and open the home screen settings. There’s a checkbox for turning the My Magazine panel on and off (I strongly suggest off).
Edit quick settings
Samsung’s quick settings are shown at the top of the main system settings list as a handy shortcut for commonly accessed menus. To tweak the list of which settings show up here, go to Settings, hit the on-screen menu button, and select Edit quick settings. This screen allows you to pick any 12 pages from the settings list to keep right at the top.
Screen indicator swipe

As your list of apps and widgets grows, you might end up with a lot of pages on the home screen and in the app drawer. Swiping again and again to get through all of it is liable to give you finger strain, or something. TouchWiz has a solution, though. Just tap the indicator dots on the bottom of the home screen and app drawer, then drag left or right to zip through pages in a flash.
Tips and tricks to get more on Samsung Galaxy S5....
The Samsung Galaxy S5 is a big phone, both physically and figuratively. Packed within its slightly boring plastic shell is mega-powerful hardware running the latest and greatest software from the world’s top Android manufacturer. When a phone has as many features as this one, figuring out where everything is and how it works can be a little daunting.
Samsung’s TouchWiz Android skin used to be horrific, but has improved quite a lot. All you need is a little primer on where all the best stuff is hiding and what features are worth your time. These tips will help you make the most of your shiny new GS5.
Sort the app drawer
The default arrangement for the Galaxy S5 app drawer is alphabetical, but you can set it to group apps however you like. Tap the menu button in the corner and change View as to custom. That menu also lets you create folders in the app drawer for better organization.
Toolbox
The Toolbox is one of those feature that makes a ton of sense, but isn’t very prominent, all tucked away in the settings menu. This is a floating icon (think: Facebook chat head) that opens a list of customizable app shortcuts. It can be toggled on and off with the button you find in the expanded notification in the notifications drawer. You can configure which apps are listed in the main system settings for the Toolbox under Sound and Display.
OK Google...
The updated TouchWiz home screen has Google voice search hot-word detection built right in. If you can see the search bar, you can say “OK Google” to launch the voice interface. Tell your phone who you want to call or text, or ask it common questions to get search results or Google Now cards. It’s almost identical to stock Android devices.
Register fingerprints for better accuracy
The Galaxy S5 fingerprint reader is a little finicky, but setting up your prints correctly goes a long way toward improving accuracy. You get eight swipes to register each print, but don’t just hold your finger straight up and down every time. Tilt a little bit side-to-side several times so the phone learns what the patterns look like in those directions too.
Kill S Voice
It’s strange that S Voice still exists, considering the more prominent role for Google’s own voice function on the Galaxy S5’s home screen. S Voice is still hidden behind a double-press of the home button, but that comes at a cost: after a single press of the home button, the phone will delay briefly to wait and see if you’re going to press it again it to activate S Voice. Yeah, not likely, Samsung. Get rid of the delay by going into the S Voice app settings and disable the option to wake up via the home button.
One-handed mode
Being a big phone, one-handed operation can sometimes be an issue with the Galaxy S5. To help with that, head into the main system settings and find One-handed operation under Sound and Display. Once enabled, you can toggle it on with a quick edge gesture—swipe in from the edge of the screen toward the middle and back out again. The screen shrinks down toward the lower right corner, making it easier to reach everything.
High screen sensitivity
Buried in the settings is an option to make Galaxy S5 owners in colder climates very happy in the winter. High screen sensitivity mode lets you use the device with regular gloves on (rather than those special touchscreen gloves). This feature can be found in the Display sub-menu, or a few rows down in the notification toggles.
Ultra power saving mode
You need not fear a dead battery when you’re away from the charger with a nearly empty Galaxy S5—the new Ultra power saving mode can give you substantially more standby time by shutting off CPU cores, blocking background tasks, and flipping the screen to a delicious retro black and white theme. The toggle for Ultra Power Saving Mode is in the notification area, but you’ll want to check it out and get your apps set up before you need it.
Separate home and lock screen wallpaper
Many Android devices just use your home screen wallpaper on the lock screen, but Samsung offers you the option to set these individually. Check the Settings for the Wallpaper item and then select home screen, lock screen, or both from the menu before picking an image.
Disable built-in apps
Both Samsung and your carrier have been kind enough to include some non-removable apps that you’ll probably never use—thanks, guys. While you can’t truly delete them, you can at least disable them so they don’t show up in the app drawer or run in the background. Head to the Application Manager in settings and swipe over to the All Apps tab. Open the info screen for any app you want to silence and tap Turn off.
Alternately, you can long-press on an icon in the app drawer, and drag it up to the “Disable” link at the top of the screen.
To re-enable any of these apps, go to Settings > Applications >Application Manager and look for the Turned off column on the far right.
S Finder
The notification shade in TouchWiz is graced by two new, non-removable buttons, one of which is S Finder. This one is actually a pretty useful universal search app that finds matching apps, calendar appointments, browsing history, bookmarks, contacts, messages, files, settings, and more. It’s a great way to find that sneaky hidden setting buried 4 sub-menus deep. You might as well make use of it.
Customize notification toggles
The handy buttons at the top of the notification shade might not contain all the settings you want, but that’s no problem for someone like you who had the good judgment to buy a Galaxy S5. To customize these buttons, open the expanded toggle list with the button in the upper right corner, then tap the edit button in that same area. From this menu you can drag the buttons around so the ones you use most are easily accessible.
Newsletter
Get the latest news, trends, apps, and tips for your Android phone.
Get our Greenbot download newsletter
Go
Blocking mode
That drunk phone call from your idiot friends at 2 in the morning will never again trouble you after setting up this feature. Just openBlocking Mode under Personalization in the main system settings, and decide what kinds of notifications you want to block—calls, alarms, or all notifications. Now you won’t be bothered during your quiet hours unless you get a call from a favorite contact.
Disable My Magazine
Samsung’s My Magazine is basically a Flipboard widget that takes up a whole home screen panel. Even if that sounds neat, it’s ridiculously slow. If you want to turn it off, just long-press on the home screen and open the home screen settings. There’s a checkbox for turning the My Magazine panel on and off (I strongly suggest off).
Edit quick settings
Samsung’s quick settings are shown at the top of the main system settings list as a handy shortcut for commonly accessed menus. To tweak the list of which settings show up here, go to Settings, hit the on-screen menu button, and select Edit quick settings. This screen allows you to pick any 12 pages from the settings list to keep right at the top.
Screen indicator swipe
As your list of apps and widgets grows, you might end up with a lot of pages on the home screen and in the app drawer. Swiping again and again to get through all of it is liable to give you finger strain, or something. TouchWiz has a solution, though. Just tap the indicator dots on the bottom of the home screen and app drawer, then drag left or right to zip through pages in a flash.
16 simple tips and tricks to get more from your LG G3
16 simple tips and tricks to get more from your LG G3
The LG G3 is one of the best Android smartphones available, besting the competition with its gorgeous QHD display in an almost bezel-less package. Of course, it's not all about hardware with the G3, as LG has provided many great software features, too. If you're a new LG G3 owner, these quick and simple tips will help you get the most from your awesome phone.
Run two apps at once with Dual Window

Dual Window lets you run two apps side by side with ease.
Samsung and LG have given their recent devices the ability to run two apps side by side, at the same time. This feature may be limited to only a handful of apps, but it can most certainly come in handy when trying to multitask.
To access the Dual Window feature on the G3, hold down on the back button, and a menu (above) will pop up with a list of apps. From there, you can drag one app to the top and one to the bottom. The combination of apps will be saved for later use.
A few apps can even interact with one another. For example, if the file manager and messaging app are opened in Dual Window, you can easily drag a photo from the file manager into the messaging app.
Take notes and doodle with QMemo+

QMemo+ makes it easy to jot down a quick note or draw a bad Android figure.
QMemo debuted on the Optimus G, and it still remains a useful feature in the G3,. It has even appended a "+" to its name. The feature is only a swipe away on the G3, no matter what you're doing. Using a similar gesture to accessing Google Now (swipe up from home), QMemo is also available by swiping diagonally up and to the right. Alternatively, the feature is also available by holding the volume up button when the G3 is in its locked state.
QMemo allows you to take a screenshot of whatever the current screen is being displayed, and you'll immediately be able to jot notes down via text or by drawing directly on the screenshot. You can also choose to switch to the "Paper" view, which gives you a blank canvas for notes and doodles.
Possibly the simnplest use of QMemo+ is its ability to take screenshots, offering an alternative to the volume down and power button combination that can sometimes be a bit tricky to pull off.
Remember to change your Quick Settings

Too many options in the quick settings menu? Change and rearrange options to get whats important to you front and center.
LG has provided quick settings options in the notification panel for some time now, and it's incredibly easy to customize.
With your notification panel open, swipe through the quick settings options until you see the Edit icon at the very end. From here, you'll be given a list of the options that can be displayed in the notification panel.
Each option has a checkbox to the left of it and three lines to the right of it. Checking a box will show the option in the notification panel and un-checking it will remove it. If you want to change the order of notifications on the panel, touch and drag it to the position of your choosing and it will be reflected in the Quick Settings panel immediately.
Tweak the Navigation Bar

Moar buttons! Get quick access to your notification panel and QMemo+ by adding more buttons to your navigation bar.
While LG defaults to the same navigation bar layout as stock Android, you can add a few extras to it and even change the theme.
In fact, you can have up to 5 buttons on the navigation bar. Additional buttons for the notification panel, QMemo+, QSlide, and Dual Window are the only options available, so don't get your hopes up for the ability to have a custom app on your navigation bar. You can also drag around the icons to change the order.
While limited to only four options, users can also change the theme of the navigation bar. You can choose white or black, each of which has a gradation theme. It's nothing terribly special, but it's a nice touch.
To change the navigation bar, go to the Display tab in the settings menu and tap on Home touch buttons.
Set up a Knock Code

Setting up Knock Code is very easy, and you'll have a backup pin just in case you forget it.
Knock Code is an interesting and innovative feature that makes a great alternative to the recent additions of fingerprint sensors in a few smartphones today. Knock Code debuted on the LG G Pro 2 and allows you to create a "code" in the form of a combination of taps on specific areas of the screen.
If you don't want a password, pin, or pattern to unlock your G3, Knock Code is where its at. Best of all, you can use Knock Code while your phone is asleep to immediately jump into the phone without having to turn the screen on, then enter your password.
Under the General tab in the settings menu, go to Security > Lock Screen > Select screen lock. Select Knock Code and you'll then be asked to create and confirm a Knock Code pattern. The setup will also require you to create a backup pin in case you forget your knock code.
Guest Mode keeps your stuff safe from prying eyes

Get some peace of mind when handing over your phone to someone else with Guest Mode.
Guest Mode lets someone else use your phone without getting full access to your files, photos, and other private content. The feature allows the owner to set a specific unlock pattern, as well as select what applications are available in this mode. This limited functionality can be useful if you have sensitive information on your phone, or want to restrict the apps they have access too, like kid-safe games for your child.
To enable Guest Mode: Under the General tab in the settings menu, tap on Guest Mode. From there you can select which apps Guests will have access to, change the wallpaper, and select the lockscreen type. When the other person unlocks your G3 with the designated Guest Mode code, they'll be in the walled garden you have sculpted for them.
Change the System Font and Home Themes

Changing the system font on the G3 only takes about three taps.
If you're looking to liven up your homescreen experience or want a more playful font spanning across most of your apps, LG provides an easy way to do both.
When you change the system font on the G3, the new font will be displayed, well, system wide. This means all the text in your status bar, your messaging app, basically everything will be changed.
The pre-installed options for system fonts are kept at a minimum on the G3, but more are available to download with the LG SmartWorld app.
Under the Display tab in the settings menu, tap on Font type and select your font.
After you change the system font, you can also change the Home theme the same way by going to the display settings and tapping onHome screen.
Get a grip with One-handed operation

Wield the G3 with one hand with One-handed operation.
The LG G3 is a powerful smartphone with great features across the board, but there's no denying that it's a big phone. Unless you have very large hands, you'll likely use it with two hands. Luckily, LG has a feature to help alleviate this problem, called One-handed operation.
With One-handed operation enabled, you can adjust the alignment of the dialer, keyboard, and lock screen, making them easier to use with one hand.
Under the General tab in the Settings menu, tap on One-handed operation. Check the boxes for the features you'd like to enable, and you're good to go.
Quickly launch apps with shortcut keys
Looking for a quick way to shoot a photo or take a note? The G3 has you covered.
While the phone is in its locked, sleeping state, you can launch the camera by pressing and holding on the volume down button. Holding down on the volume up button while the phone is locked will launch the QMemo+ app.
This is a pretty cool feature to have at your finger tips, but the downside to the shortcut keys is that there is no way to change which apps they summon, so you're stuck with Camera and QMemo+ whether you like it or not. The only option, found under the General tab in Settings, is to disable the shortcut keys completely.
Smart cleaning reminds you to clean up your junk
One of the LG G3's new features is called Smart Cleaning, and it will remind you to delete apps apps you don't use and other data to free up space on the phone.
Smart Cleaning will remind you to delete temporary files or items found in the download folder after a certain amount of time. It will also suggest you delete cache from apps, temporary Clip Tray files, and apps that haven't been used after a certain amount of time.
By default, both the notification interval and idle time period is set at 1 month but both can be reduced or lengthened.
Smart cleaning settings can be found under the General tab in the settings menu.
Grow or shrink app views

A quick pinch gesture is all it takes to change the view in your recent apps menu, gallery, and messaging.
One nifty feature that is easily missed on LG smartphones is the ability to grow or shrink the view of certain applications. Previously, the feature was limited to the Gallery and Messaging apps but the latest software on the G3 brings the same function to the recent apps menu, too.
In any of the three supported apps, you can shrink or grow the app's view with a simple pinch in or out gesture. The gesture shrinks or enlarges text in the messaging application, increases or decreases the number of viewable apps in the recents menu, and changes the thumbnail size of albums in the gallery app. It's hardly a game-changing feature, but it's definitely a nice option.
Make LG Health an icon on your home screen

Make LG Health an icon instead of a large widget with this workaround.
Recent Phone Stories
LG Health is a handy app that lets you track your steps, exercise stats, and even map out your path during a run. Unfortunately, the the only way you can get to it is through a widget on your home screen. This also means that you won't find LG Health in the app drawer at all. Luckily, with a third-party app, you can create an icon for LG Health easily and free up some home screen space.
Download QuickShortcutMaker from the Google Play Store. Open QuickShortcutMaker and search for LG Health. When the result populates, tap on the downward-pointing arrow to reveal the app's activities. Tap on com.lge.lifetracker/com.lge.lifetracker.MainActivity.
To test the shortcut, you can tap on the Try section on the next screen. Tap on Create and LG Health will appear as an icon on your home screen.
Accessibility tweaks
The accessibility settings menu on the LG G3 is full of little tweaks that you may not be aware of.
Touch Zoom allows you to tap three times on any area of the phone, with the exception of the keyboard and navigation bar, to zoom in. Once in this zoomed-in mode, you can pan by dragging two fingers around and adjust the zoom with a pinch gesture. Another three taps will bring you back to the standard view.
Flash alert is exactly what it sounds like: the camera flash will light up when incoming notifications and calls arrive. Helpful when you've lost your phone or just to add some blinding flair.

Get quick access to frequently-used phone features with Universal Touch.
Universal Touch enables an always-on icon that will be available across every screen of the phone. Tapping the icon brings up a large window in the center of the screen, offering up basic functions for volume, power, home, screen capture and settings.
You can also launch apps for settings, calling, messaging and browser by drawing the first letter of the application's name on the open Universal Touch window.
Lock your photos and videos away for your eyes only

Securely hide your private photos and videos with Content Lock
If you have sensitive photos or videos that you want to make sure nobody can access but you, LG provides a way to lock them behind a password with its Content Lock feature.
Before you start locking away your selected content, you must first set up a password. To do this, go to Settings > Security > Content lock. It will ask whether you want to set a password or a pattern and to provide a valid email address in case you lose it.
From there, you can go into the gallery app, tap on the action overflow (three vertical dots) button on the top right and tap onLock. Select the content you want protected, and it will be hidden, accessible only by your password.
Lock screen customization
Unless you disable it completely, you probably look at your phone's lock screen several times a day. If you need to spruce it up a bit, head over to Settings > Lock screen to get your tweak on.
This menu will allow you to change the type of lock screen, wallpaper, unlock animation, and your shortcuts. You'll also be able to enable lock screen widgets here, so I suggest you spend some time getting to know this menu well.
Root your G3 with one click

Rooting your G3 is only a tap away.
If you’re looking to root your G3, Stump Root is an app that will root any U.S. variant with one-click.
To get your root on, all you’ll need to do it head over to the XDA thread and download Stump Root via your phone or computer. After that, you’ll need to sideload the app onto your phone, and you’ll find a handy guide right here to do just that.
If you’re in a quiet area, I’d suggest you turn the media volume down on your G3, as Stump Root has some old school Nintendo music that plays when you first open it. The app gives you one function, Grind, and tapping it will begin the rooting process.
If all goes well, you’ll be asked to restart your phone. From there,install the Superuser app and enjoy your newly-rooted G3.
Popular Posts
-
Download it from here😍
-
 Shutdown Your Computer or a Remote PC via Command Prompt Most of us shutdown our computers using the power button given in the Start menu. ...
 -
The Samsung Galaxy S5 is a big phone, both physically and figuratively. Packed within its slightly boring plastic shell is mega-powerful h...
-
 Discover New Blog Post Ideas with Google Analytics Data Anyone who has kept a blog for some time or who writes for a living has likely expe...
 -
 Useful Keyboard Shortcuts for Windows Computers While most of us are already aware of obvious keyboard shortcuts like “Alt+F4” and “Ctrl+C”...
 -
 Use Keyboard as Mouse [How To] If your mouse is not working and you don't wish to wait till you get a new mouse, you would definitely l...
 -
Janme Raghuraiya ye Sakhi Pakistaniyan ke lalkar dem


Featured post of sturdy
How To Add All Facebook Friends In One Group - Full Script
How To Add All Facebook Friends In One Group - Full Script Hello my friends today we are here to share an awesome trick which will help you...

Popular Posts
-
 Shutdown Your Computer or a Remote PC via Command Prompt Most of us shutdown our computers using the power button given in the Start menu. ...
 -
 Get Popular on the Internet We all wish to be popular. But unfortunately, getting popular is not so easy in the real world. However, in the...
 -
Guies I am back with an amazing app i.e, camera 2 whose downloading price is 199 on play store but u can download it for free from my site.....
-
Download it from here😍
-
 Connect a Laptop or Desktop Computer to a TV Easily Suppose you wish to watch a movie or share a slide-show of pictures with your family on...
 -
Janme Raghuraiya ye Sakhi Pakistaniyan ke lalkar dem
-
 Discover New Blog Post Ideas with Google Analytics Data Anyone who has kept a blog for some time or who writes for a living has likely expe...
 -
 Useful Keyboard Shortcuts for Windows Computers While most of us are already aware of obvious keyboard shortcuts like “Alt+F4” and “Ctrl+C”...
 -
6 Awesome Apps By Google You Probably Never Heard Of Lets have a look on 6 Awesome Apps by Google You Probably never Heard Of and using the...
-
HOW TO HACK WI - FIGet Anyone's Wi - Fi Password Without Cracking Using Wifiphisher Welcome back, my tenderfoot hackers! Do you ne...

