Hello friends ! This is Sourav .... Welcome in my world......✌✌

Monday, 13 June 2016

How to Reveal, Show, View Passwords hidden under Asterisks/Stars

How to Reveal, Show, View Passwords hidden under Asterisks/Stars

Most modern browsers offer the capability of remembering usernames and passwords.  Most of us use this feature to automatically save our usernames and passwords in order to log in to our favorite websites more quickly. What if you forget the saved username and password?

As web browsers intelligently hide passwords using stars(, asterisks or dots), there is no way in which a user can recover his password by simply looking at what the browser shows. Here are some tips and tricks that you can use to reveal your password for a website when you have forgotten it but your browser remembers it.

Enter your Password!

JavaScript to Reveal Hidden Passwords in Asterisk (Stars)

A simple JavaScript code can be used to view passwords in web browsers like Google Chrome, Internet Explorer, Opera in a popup as an alert message (Mozilla Firefox does not support this. Users of this browser can utilize the bookmarklet given below or the addon mentioned at the end of this post. If you use Google Chrome and the code does not seem to work, precede it with "javascript:" without quotes). To use the JavaScript, open your web browser, open the webpage for which the password is hidden in asterisks, copy and paste the following code in the address bar.

javascript: var p=r(); function r(){var g=0;var x=false;var x=z(document.forms);g=g+1;var w=window.frames;for(var k=0;k<w.length;k++) {var x = ((x) || (z(w[k].document.forms)));g=g+1;}if (!x) alert('Password not found in ' + g + ' forms');}function z(f){var b=false;for(var i=0;i<f.length;i++) {var e=f[i].elements;for(var j=0;j<e.length;j++) {if (h(e[j])) {b=true}}}return b;}function h(ej){var s='';if (ej.type=='password'){s=ej.value;if (s!=''){prompt('Password found ', s)}else{alert('Password is blank')}return true;}}


Or, alternatively you can use this Show Password Bookmarklet by dragging it to your Bookmarks Bar to instantly view hidden passwords at the click of a button.

Asterisk Password Recovery Popup in Google Chrome

Use Developer Options to show password

Open the website for which your browser has the saved password, then right click on the password box and click Inspect Element.

A code like this would be displayed:-

<input type="password" class="inputtext" name="pass" id="pass">

Change the type from password to text so that the code looks like:-

<input type="text" class="inputtext" name="pass" id="pass">

Your password would be immediately visible.

Software to reveal hidden passwords behind stars

There are many free software that you can use to recover forgotten passwords. Some of them are:-

Asterisk Logger:Asterisk Logger from Nirsoft is one such software. It automatically displays the hidden password whenever a window containing a hidden password is detected.

Password Viewer:Password Viewer by IT Samples is another application that can be used to unmask passwords hidden behind stars. It allows you to view passwords not only in web browsers but also in any program that might be masking passwords from the user. 

Both of these software are free and do not require to be installed. All you need to do is just unzip the file and run them. These software work perfectly fine on Windows XP, Windows 7, Windows Vista and Windows Server 2008, 2003. However, in Windows 7 and Vista, they are  required to be used in an Administrator Account. These tools are browser independent. These software will not be able to decrypt or show User Account Control /Windows logon password. 

Related: Essential free Software for Windows PC

Mozilla Firefox Add-on

Show My Password is a Firefox Add-on which automatically converts scrambled hidden passwords into human readable form. To use this nifty add-on, just open the webpage with the hidden password and click in the field containing the hidden password. This add-on will automatically reveal the password to you.

These tips can be also be used by someone else to hack your passwords. To avoid such mishaps, I would advise you to stay alert when others use your private computer.

Share:

Install, Boot Windows from USB Pen, Thumb or Flash Drive

Install, Boot Windows from USB Pen, Thumb or Flash Drive

Normally, Windows is installed using optical media like DVDs and CDs but there are times when it is not possible to boot into the windows setup using disks probably because your DVD drive is not working or, if you are using one of those ultra-portable laptops, it is not there at all.

To overcome this problem, one can either use an external DVD drive and install Windows normally or create a bootable pen drive to install Windows whenever needed. In this tutorial, we will discuss about the latter and learn how can we create a bootable USB drive for installing Windows XP, Windows Vista, Windows 7, Windows 8 or Windows 8.1. As installing Windows from a flash drive is much faster than from a CD/ DVD, such an installation will also save time.

This article assumes that your computer has a mother board which supports booting from USB drives. Most modern laptops and desktops support it. If you have bought your computer in the last 5 years, you do not need to worry about this.

Installation Requirements
An empty flash drive with a storage capacity of 1GB for Windows XP and 3GB for Windows 8.1, Windows 8, Windows 7, Windows Vista and Windows Server 2008.Windows installation disk or Windows installation files stored somewhere on your computer.

Steps to create a bootable USB Flash Drive

Download Win to Flash. The software is still in beta phase so it is possible that it has some bugs although I have personally faced none. The latest version of Win to Flash can be downloaded from the Win to Flash website. The latest version also supports Windows 8 and Windows 8.1. To avoid this tutorial from getting outdated, I would advise to download the software from the former link if you are not planning on using Windows 8 or 8.1.Extract the downloaded zip file to any folder on your desktop. Open the folder and run WintoFlash.exe by double clicking on it.Click Next, check I accept EULA, click Next and Next again. Wait for the software to load some ads, click Next and Next again. A welcome screen like one in the image below will show up.Win to Flash welcome screenClick on the big green tick. The welcome screen will turn translucent and WinToFlash wizard will open.Wizard showing the various version of Windows it supportsClick Next. On Windows File path entry box, click Select button and select the location of your Windows disk, or the folder containing the Windows setup files and click OK.On USB Drive path entry box, select your USB flash drive's location and click OK.Click Next button. In the dialog box, encircle I accepted the license agreement and click Continue.A warning message will be displayed saying that "Formatting will erase all data on the disk". Click OK on the message.WintoFlash will show a window with a progress bar like the one in the image below.Preparing a bootable pen driveAfter the progress bar reaches the end, press Next and then press Exit. A notification to update WintoFlash might be shown, click "No just close" to close it.
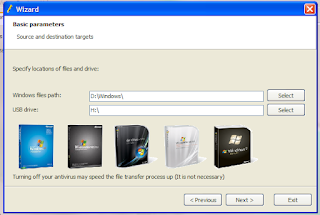
That's it. You now have a bootable pen drive that can be used to install Windows. To install Windows from it, follow the steps given below:-

Installing Windows from the bootable USB Thumb Drive

Plugin your thumb drive.Start your computer. Go into the BIOS setup by pressing the Delete key. In the boot menu, select your flash drive as the first boot device. Save settings and restart your PC. (This step might be different for different computers. Check your system guide to know how to change the boot order in your PC.)Windows setup will load.Install Windows by following the on-screen instructions.

This tutorial works on all versions of Windows including Windows 8.1, Windows 8, Windows 7, Windows XP and Windows Vista.

Share:

How hackers hack Facebook Account & How to stop them?

How hackers hack Facebook Account & How to stop them?

Facebook is, undoubtedly, the most popular social networking website with more than 500 million active users. Due to its popularity, many hackers (or should I say crackers?) are actively involved in hacking Facebook accounts of unsuspecting users. This article outlines the many strategies that such hackers use to gain access to Facebook accounts of hundreds of users each day and how you can stop them from hacking your account.

Facebook is one of the prime target of hackers!

Email Address Hack

I have always been puzzled by Facebook's leniency in this matter. All a hacker needs to do is know your name and he will be conveniently shown your email address at your profile. How easily a hacker can then hack your Facebook account (and everything else associated with that email id) if he 'guesses' your password (if you use a weak password) or answers your security question! This is something I hope Facebook improves on quickly. Until Facebook does so, here are some tricks you can use to protect yourself from this vulnerability.

How to safeguard your Email Address?
Just follow these steps:-

Hide your Email Address from everyone by going to Edit Profile>Contact Information>Clicking on the icon beside your email address> checking 'Only Me'.Change your primary email address to a one that is only known to you by going to Account Settings>Email> and changing your primary email to the new one (known only to you) and removing your previous email address.For additional security, when in Account Settings, check 'Secure browsing' and 'Send me an email when a new computer or mobile device logs into this account' and click Save.
A hacker at work!

Phishing

Phishing is one of the easiest ways to trick users into giving out their login credentials. All a hacker does is setup a webpage similar in design to that of the Facebook homepage, attach a server sided script to track the username and password entered and store it in a log. Sending people emails stating that someone tagged a photo of them on Facebook in the same format as Facebook and giving a link below to the phishing website further reduces the chances of it being detected as a fake. Sometimes, spam Facebook apps, like those promising to tell who viewed your Facebook profile, automatically post links to phishing websites. A new trend amongst phishers is creating Facebook look-a-like widgets for stealing user's login credentials.

How to prevent yourself from being phished?
At all costs, avoid clicking on suspicious links. Moreover, always check the URL in the address bar before signing in. Avoid logging in through various "Facebook widgets" offered by websites and blogs. Instead, use Facebook's homepage to sign in. Always try to use Safe Search while searching. If you do manage to get phished, report the website so that others may get a warning before visiting it.


Keylogging through Keyloggers

Keylogger is a type of computer virus that tracks key strokes. Keyloggers can be installed remotely on a computer system by a cracker to record all the activity that is going on the victim's computer. Keylogging gets more easy if the hacker has physical access to the victim's computer.

How to stop keyloggers?
Install a good antivirus and update it frequently. Do not click on suspicious links and avoid downloading illegal software. Also, avoid installing free toolbars and other such spam software. Always scan third-person's flash and pen drives before using them on your computer.

Some more basic tips can be found here:PC Security tips to make computer secure

Social Engineering

Social engineering involves using any trick to fool the user into making himself vulnerable to exploits. This could involve anything from sending spoof emails, pretending to be from Facebook, telling you to change your password to 12345678 to a hacker maliciously getting out the answer to your security question in a friendly chat or discussion.

How to prevent yourself from being socially engineered?
Stay aware during chats and discussions. Use a tough security question, preferably one whose answer you would never disclose to anyone. Moreover, Facebook, or any other company for that matter, will never ask you to change your password to 12345678 or do something as silly as asking you to send out your login details to prove that you are an active user. Always think before taking actions and your e-life on Facebook will be safe from hackers looking to hack Facebook accounts

Share:

Tips to Shop Safely Online

Tips to Shop Safely Online

Shopping online is becoming increasingly popular with consumers of all ages. With fast shipping and websites selling virtually everything, online shopping is an attractive alternative to the hassle of visiting multiple stores.

However, eCommerce safety is a huge issue, and many shoppers are unaware of how to ensure that their online transactions are safe, secure and private. Fortunately, there are a number of simple signs to look out for and changes you can implement to make purchasing items on the Web considerably safer.

The most common methods used by hackers to steal consumer information are phishing sites and emails. Hackers may set up websites that look similar to other branded sites and send emails to potential customers of those companies urging them to shop through special links. By gaining consumer trust through having a similar appearance to the original company’s website, hackers make consumers feel more comfortable about entering their details into such sites, including credit card information.

Avoiding phishing emails and websites is simple. Any time a shopper receives an email from a company asking them to shop or navigate to a website, they should carefully check the domain the email is being sent from or the URLs of the links they land on. All email addresses and URLs should contain the company’s official domain.

Having updated antivirus and firewall software is also necessary. Also, one must ensure that he or she is using the latest version of the web browser of their choice. Most modern web browsers have inbuilt mechanisms to detect spoofed websites.


A common trick to watch out for is a minor misspelling in the domain name that may be hard to pick up without careful attention. Additionally, some hackers may place the company’s name before the @ symbol in the email address, rather than after, which is where it should be.

All pages, including login pages, asking for consumer details, such as billing/shipping addresses and payment information, should have URLs that begin with “https://” rather than the more commonly used “http://.” The “s” denotes a secured connection and provides encrypted communication between a shopper’s computer and the receiving company’s servers.

Preferably, the site will also have a verifiable certification showing that the site can be trusted and that the installed security suites are up to date. Many sites display a security certification image link or privacy seal, making it easy to verify their status.

People who decide to shop on websites they’ve never heard of should ensure that these sites are legitimate. This can be done by searching for online reviews and confirming that the site is listed as a secure site with a trusted online security company.

One must be extra cautious while shopping on shared computers and always remember to not save login information in the web browser. Logging out and clearing cookies once you are done is also recommended.

Shopping with certain methods of payment and opting for tracked shipments can also provide enhanced protection. Payment services, such as Paypal, allow buyers to dispute charges and other issues they may have with sellers. Many credit cards offer similar protection, and since they aren’t linked directly to a bank account, hackers can’t drain a shopper’s finances. Finally, trackable shipping allows shoppers to find out exactly where their packages are, providing added confidence in the legitimacy of any seller's services. All tracking information should originate from the shipping service and be trackable within 24 hours of receiving the tracking number

Share:

Wirelessly Transfer Files on Android Devices With Dropbox

Wirelessly Transfer Files on Android Devices With Dropbox

As great as smart phones have become when it comes to handling our digital lives, there are still a few tiresome concessions we make for their use. One is having to plug our device into our computer in order to transfer files. Some manufacturers such as Apple have launched new services to alleviate that using cloud computing. Here is one way you can send files to your Android based phone completely free without the help of a USB cable. 
Transferring files wirelessly on Android using Dropbox is easy
Step 1: On your computer, navigate to dropbox.com and download the application installer.

Step 2: Once the application has been downloaded, run it and an initial set up wizard should begin. 

Step 3: Using the initial set up wizard, create a Dropbox account by entering your name, email address and computer name.

Step 4: folder called Dropbox should now be available on your computer. Put any file you wish to wirelessly send to your phone in this folder.

Step 5: On your Android phone, open your App drawer and open the Market application.

Step 6: Search for Dropbox and install the application.

Step 7: Once installed, return home and re-open your App drawer and start up the Dropbox app.  

Step 8: Tap the existing Dropbox account button and log in using the account you just created in step 3.

You should now see any files you have in the Dropbox folder. Transferring additional files to your phone wirelessly is now as easy as dragging them into the folder and starting the app on your phone. Dropbox allows you to send up to 2GBs of data for free. Any files larger than that will either have to be transferred via hard connection or you’ll have to sign up for a 50 or 100 GB plan.

Share:

Enable Task Manager disabled by Administrator or Virus in Windows

Enable Task Manager disabled by Administrator or Virus in Windows

Windows Task Manager is used to view details about processes running on your computer. Since it can be used to terminate programs that are misbehaving or are viruses disguised in the form of harmless programs, most spyware and viruses disable it to prevent themselves from being closed through it. Some administrators also disable Task Manager to prevent users from closing important security programs like antiviruses and anti-malwares.

In such situations, running the Task Manager will give the "Task Manager has been disabled by Administrator" error. However, there are some techniques you can use to re-enable task manager and close those harmful programs manually. This article contains few such simple techniques you can use to regain access to Task Managing privileges.

Enable Task Manager from Registry in Windows 8, 7, XP or Vista

Registry Editor is an inbuilt Windows tool that is used to modify registry keys which tell Windows how it should work. A simple registry modification can be used to bypass the Task Manager block. To do so, just follow the steps:-
Click on Start. Go to Run. If you use Windows 8, Windows 7 or Windows Vista, go to Search.Type regedit and press Enter. Registry Editor will start. If Registry Editor is also disabled, you will first need to enable registry editing.Through the left hand navigation pane, navigate to HKEY_CURRENT_USER\Software\Microsoft\ Windows\ Current Version\Policies\System. If the System key is not there, you will need to create it.In the work area, locate "DisableTaskMgr". If this value is not there, you will need to create a new DWORD value called DisableTaskMgr. Double click on it. A window will pop up.Enter its value data as 0 and press OK.

Close Registry Editor. If Task Manager is still disabled, restart your computer.

Enable Task Manager from the Group Policy Editor (Gpedit.msc)

Windows Task Manager in Windows 7Group Policy Editor is a feature in Windows which is used to edit local policy settings. It can also be used to enable Task Manager. To do so, just follow the steps given below:-
Open Start Menu. Windows XP users click on Run. Windows 8.1, Windows 8, Windows 7 and Vista users, go to Search.Type gpedit.msc and press Enter. Group Policy Editor Window will show up.From the navigational pane at the left hand side, go to: User Configuration>Administrative Templates>System>Ctrl+Alt+Del Options.In the work area, double click on "Remove Task Manager" and set its value to Disabled or Not Configured.Restart your Computer or Log Off and Log back On to apply the changes.Group Policy Editor is not available on home editions of Windows.

Enable Task Manager by Running a CMD Command

Command Prompt can also be used to directly enable Task Manager. 
Open Notepad.Copy the code given below and paste it.

REG add HKCU\Software\Microsoft\Windows\CurrentVersion\Policies\System  /v  DisableTaskMgr  /t REG_DWORD  /d /0 /f


Save the File as TaskManager.bat.Run TaskManager.bat as Administrator if you use Windows 8, Windows 7 or Windows Vista. In Windows XP, simply open the file. A command prompt window will flash for a second and then disappear indicating successful execution. After running the batch file, you will be able to again use Task Manager. If Task Manager is still not available, restart your computer.

Create a Registry(.reg) file for enabling Task Manager

If you are unfamiliar with manually editing the Registry, you can create a Registry file which will automatically modify the Registry Key to re-enable Task Managing. To create one such file:-
Open Notepad or any other text editor.Copy the code given below and paste it as it is in it.

Windows Registry Editor Version 5.00 [HKEY_CURRENT_USER\Software\Microsoft\Windows\CurrentVersion\Policies\System] “DisableTaskMgr” =dword:00000000


Save the file as Enable Task Manager.reg or *.reg.Open the file by double clicking on it.Registry Editor will ask you for confirmation. In the confirmation Window, click Yes.Task Manager would immediately be accessible. If it is not, restart your computer.The techniques mentioned in this article work on Windows 8.1, Windows 8, Windows 7, Windows XP and Windows Vista

Share:

Increase Battery Life on Android Mobile Phones

Increase Battery Life on Android Mobile Phones

Anyone who has a smartphone knows that battery life is an issue. At the moment, the smartphone industry tends to favor performance over battery life when developing specifications for their new devices. To be perfectly honest, I am all for this. I would argue that it's better to have a zippy phone that acts quickly when I need it to rather than a slow, less sleek device that can withstand a few days of use without charging.

This is probably because I've mastered getting what I need from my phone while using the smallest amount of battery resources possible. Getting the best battery life from your phone can be somewhat complicated because everyone has a different opinion on what you should use and which (if any) features you should sacrifice to conserve battery. Fortunately, I have a simple method that works for every Android phone I've ever encountered.


Display Screen

As a universal fact across all phones, the biggest drain on your battery is your display screen. Personally, I've found the auto-brightness control to work extremely well. To adjust to auto-brightness, go to  
SettingsàDisplay settingsàBrightness, and then just check Automatic brightness. It dims the brightness when you're in darker rooms (as it doesn't need to compete against other light sources and glare), but will really up the brightness if you're outside so that your phone is actually usable. However, if I'm really trying to conserve battery, I will turn off auto-brightness and set the brightness to very low (around 25%).

Also, be sure that you don't have an extremely long timeout (inactivity time before your screen automatically shuts off) as this will drain your battery. I personally just prefer shutting the screen off manually by pressing the power button rather than waiting for a timeout; this way my phone won't timeout on me when I am just reading something on it.

Live Wallpapers
Live wallpapers have a considerable impact on your battery life. Not using them is always a good idea if you want the best time from your battery.

Close Unnecessary Applications
If your phone has some applications running that you are not currently using, you should close them from the Task manager to avoid putting unwanted pressure on your phone which in turn will cause your battery to drain quickly.

Reduce Volume of speakers
Lowering volume of your phone's speakers can also have noticeable improvements in your phone's battery life.

The Power Control Widget

If you have a fairly recent phone (anything running Android 2.1 or higher), you are already blessed with a completely awesome "Power control" widget. If your phone does not have this widget, you could always download one from the Play store. This is a must for your home-screen. With this widget, you can enable and disable WiFi, Bluetooth, GPS, and Auto-sync in addition to adjusting brightness levels between auto, low, medium, and high.

The only thing this widget left me wanting was the ability to enable and disable mobile wireless networks(3G and/or 4G network). Some phones allow you to do this by pulling down the "statusbar" at the top of your phone (where notifications, battery life, and signal are) and selecting or unselecting "Mobile data." Other phones allow you to control mobile wireless networks by holding down the power button. Worst case scenario, you can adjust it in "Settings."

Now, when to enable and disable these features, all boils down to preference. I only use Bluetooth, WiFi, and GPS as I need it; otherwise it's off. If you have a WiFi connection available, it's generally better for your battery to use it rather than using your mobile wireless network (especially if you get poor signal for your mobile wireless).

Share:

Twitter SEO: How to Use Twitter to Get Higher Rankings?

Twitter SEO: How to Use Twitter to Get Higher Rankings?

There was a time when Twitter wasn't a popular form of social media. Quite a few people would have had a Twitter account prior to it being popular, and perhaps they too never used it. Its popularity these days as a form of social media has seen more users than ever before jump on the Twitter bandwagon.

Twitter is excellent because it allows you to give short and sharp pieces of information to potential customers. In this day and age, when our attention spans are extremely short when it comes to looking at things on the Internet, Twitter is perfect, and whether you are new to Twitter or a seasoned pro, there are plenty of benefits to be had for your business.


Tweets are a form of linking, and despite links on Twitter being nofollowed, they can still affect your SEO campaign. If your account is new and you manage to get followed by a popular user, you will see an increase in your Twitter profile's visibility in search results. If more people having authoritative accounts start to re-tweet your updates, search engines will start seeing your account as an authority as well. Tweeting links from your website from this account will help search engines trust your website more and will definitely contribute towards increasing its search rankings. 

To help your account be seen as an authority, you need to make sure that you:-

Offer quality, not quantity when it comes to Tweets
With only a small number of characters available to you per tweet, it's important to think about what you want to get across, and to include all the information necessary. Again, short and sharp pieces of information that remain in your follower's mind are recommended. Your tweets should keep your followers curious and leave them wanting more. 

Keep your Twitter account updated frequently
People like to see something new. If there hasn't been a tweet for a month, then your followers and profile visitors could just assume that you are not active anymore and they will stop following or visiting your Twitter account. To overcome this and keep visitors coming back, make sure you have an interesting profile page that is constantly updated, as visitors will want to find out what will be on your profile next. 

Re-tweet someone else's tweet
By interacting with others in the Twitter-verse, you will not only be able to build brand awareness but also a loyal following that will stand by you. It will change how you are perceived online and your followers will also be able to trust you more. If people start recognizing that you and your website provide excellent content, they would sub-consciously not hesitate to re-tweet your stuff. Once, they start doing that, becoming an authority will not take much time.

Ultimately, Twitter is beneficial not because of the SEO advantages it provides but because it helps in building relations with people and increasing brand awareness. In the long run, both these things combined will help your website more than higher search engine rankings.

Share:

7 Wi-Fi Tricks to Increase Your Speed

7 Wi-Fi Tricks to Increase Your Speed

Chances are if you have a wireless internet connection at your home, you have had some trouble with the speed of the connection at least once before. That being said, a slow wireless connection can be frustrating to deal with. You are probably paying good money to your internet service provider, so slow speed is something you should not have to deal with, right? Well, the truth is wireless speed can be affected by a number of things. Luckily there are some Wi-Fi tweaks you can try that should help boost your speed and get you rolling in no time.

1. Reposition Your Router

The position of your wireless router plays a major role in the speed and strength of your wireless connection. If you are having trouble, you should try to reposition your router in a centrally located area, where the signal can equally reach each wireless device in your house. If your router is near an outside wall, try to move it closer to the middle of your house. Routers that are placed near outside walls can send some of the signal outside, which can risk your wireless connection’s strength and speed.

2. Purchase a Wireless Signal Repeater

Adding a wireless signal repeater to your home network can greatly increase the speed of your connection. A repeater works by extending your signal without having to add any additional wires. All you have to do is simply place the wireless repeater in a location that is between your router and your wireless device(s). It will instantly boost the wireless signal that is sent from the router to your devices, meaning faster speeds for you.

3. Install a New Antenna

Most wireless routers come standard with an omnidirectional antenna, meaning it broadcasts the wireless signal in a circular radius to reach various places in your home. If your router is in a perfectly centered location between all of your wireless devices, this is probably fine. But if your router isn’t perfectly centered among devices, you should think about replacing the existing antenna with a stronger one, known as a high-gain antenna. You can usually remove your old antenna and replace it with one of these stronger antennas to boost your signal strength, therefore increasing the speed of your connection. Another perk of a high-gain antenna is its ability to focus the wireless signal in any direction you prefer.


4. Use One Brand of Equipment

You may not think that using different brands of equipment can reduce the speed of your wireless connection, but in reality it can. If you use different brands of equipment, your components may not work as efficiently. This is because many manufacturers of wireless networking equipment pre-install enhancements in all of their products. These enhancements can boost speed, but will only work if products from the same manufacturer are used simultaneously. If you are using various brands of equipment and your speed is suffering, this is definitely worth a try.

5. Reduce Frequency Interference

Many household electronics, such as cordless telephones and baby monitors, run at the same frequency as wireless routers. This means that these electronic devices can interfere with thewireless signal that is being broadcast from your router, which can affect the speed and performance of your connection. Check the box of your router to see what frequency it runs at, and try to avoid using other electronic devices that operate at the same frequency. You can also try to change the channel on your router to avoid frequency interference.

6. Check for Firmware or Driver Updates Regularly

The manufacturers of wireless routers and network adapters often release firmware or driver updates that can improve the function of your wireless connection. You can find and download these updates at the manufacturers’ websites. Updates are usually done to fix issues, add features, and strengthen your equipment’s performance. Check for these updates on a regular basis to make sure your firmware and drivers are always kept up to date.

7. Secure Your Wireless Network

If your network is not properly secured, neighbors could be using your signal. This can reduce the speed of your connection because you are in a sort, sharing the wireless signal. Set up secure passwords and some sort of wireless encryption that will prevent anyone else from accessing your wireless network. All of these Wi-Fi tweaks can greatly boost the speed of your wireless connection. If one of them does not seem to do the trick, try another or even a multitude of options. It may take a little time and patience, but once you figure out what works to speed up your connection, you will be happy you put forth the effort.

Share:

Discover New Blog Post Ideas with Google Analytics Data

Discover New Blog Post Ideas with Google Analytics Data

Anyone who has kept a blog for some time or who writes for a living has likely experienced that feeling of no inspiration. There’s absolutely nothing left in the tank – even all the rubbish ideas have been used up and you are left feeling unmotivated. It is at this point that sometimes blogs can get abandoned, as constantly thinking up new ideas is hard work and tiring. 

My first stop when I get to this stage is usually Google News. Just having a read through some of the top stories can trigger a hook to link one to the theme of your blog, and if you optimise properly, you could even get on top of some of the traffic for that particular story. It is easier said than done, however, and there aren’t always big stories around that are relevant.

What I prefer to do is rely on Google Analytics to work as my inspiration on those uphill days. Chances are you will be getting some longtail traffic in to your blog. If you aren’t, you may need to work on your blog’s optimisation a bit before this technique is useful. By scrutinising your longtail traffic and understanding the terms people are actually using to reach your blog you can get some innovative ideas as to areas to plan your next blog posts around.

So to look at longtail traffic in Analytics you need to go into the Traffic Sources -> Keyword report (or Traffic sources -> sources -> search -> organic if you are using the hideous new version of Analytics). Go to page 10 of referring key terms and have a poke about to see what’s in there. Chances are there will be some quite interesting terms.

For example, a quick look at a random sample of my referring key term report reveals that there could be good mileage in blog posts about cartoon audio effects, music for schools, thunder sound effects and tire skid sound effects. These base ideas can be expanded into popular/entertaining/ interesting topics – best cartoon sound effects, most impressive tire skids in films, top 5 thunderstorm scenes in films, teaching with music in school. Sometimes you hit the jackpot and come across an idea that can be extended into a series of blog posts.

The joy of using this technique is as your blog grows stronger and starts ranking better for more longtail traffic, you will get even more inspiration delivered straight into your Analytics. Obviously you do need to continue using your own ideas to mix it up a bit and keep on top of trending topics but I highly recommend Analytics for those slow days.

Share:

How to Fix a Slow Windows 7 Computer

How to Fix a Slow Windows 7 Computer

Most people love using Windows 7. That’s because it’s by far the nicest and the most productive Microsoft operating system to date. But there can still be glitches, errors, and lags. The good thing about Windows 7 is that it has lots of tools to troubleshoot and repair a slow computer. Here is a guide to where to find them and how to use them.

1. Problem Steps Recorder

Problem Steps Recorder is a great solution to get a detailed description of the problem, so that you can either review the report yourself or send it to a tech support team. Basically, this tool records everything happening on the computer that needs troubleshooting. It records all mouse clicks and everything that is pressed on the keyboard, takes screenshots, and then saves the report as a zipped MHTML file. This file can be easily emailed and analyzed. To enable Problem Steps Recorder, click on Start, type PSR and hit Enter. Then click on Start Record. To save a report, just stop recording your computer activity.

2. Troubleshoot problems

If something in Windows 7 starts behaving in a weird way and you have no idea why, go to the Control Panel, locate the “Find and fix problems” (Troubleshooting) option and you’ll be able to access the Windows 7 troubleshooting tools. They are easy-to-use wizards and can fix common problems, clean your system, check your settings, and lots more. 

3. Discover bottlenecks

Under normal circumstances, Windows 7 easily outperforms Vista and XP. Nevertheless, your computer can still seem too slow from time to time. Most likely it’s an application or a process that’s slowing you down. Windows 7 makes it really easy to find bottlenecks with the help of Resource Monitor. Just click on Start, type RESMON and hit Enter to launch the tool. When it opens, click on the CPU, Memory, Disk and Network tabs to see which processes are hogging your system and using up your bandwidth. When you find the process that’s holding you back, you’ll be able to try to fix it right from the Resource Monitor. For example, if a process is locked up, right-click on it and select Analyze to see where the problem lies.

4. Repair your computer

If something goes seriously wrong and Windows 7 fails to start, it might be possible to repair your computer without the installation CD. Just boot your PC and press F8 during startup. You should see an option called Repair Your Computer. Select it and press Enter to see the recovery options Windows 7 has to offer.
These Windows 7 tools will help you troubleshoot and fix a slow computer in a quick and easy way. To prevent your computer from slowing down, use maintenance utilities like disk cleanup and defrag to keep your PC in top shape.

Share:

Know if your PC is infected with Viruses, Trojans or other Malware

Know if your PC is infected with Viruses, Trojans or other Malware

The reason why most computer malware are so deadly is because many users fail to recognize whether they have been infected or not. Had they detected the infection at an earlier stage, the damage caused could have been greatly reduced. As each virus is programmed differently, it becomes difficult to identify a virus outbreak. However, there are some general symptoms that make it easy to detect an infected computer. Here are some of them:-

1) Programs won't start or crash suddenly: If some system programs like the task manager orregistry editor have suddenly stopped working or crash randomly without any visible reason, it is more than likely that your computer has got some form of worm that is attaching itself to various programs and thus, corrupting their code. A virus modifying registry entries to prevent these programs from running could also cause this. 

2) Unusual Network Traffic: If even after closing your browser and other applications that may use the internet, you see that your computer is still downloading or uploading anything, then your computer is possibly infected with some form of spyware that is either downloading other viruses to your computer or is uploading your private information to a remote computer. In case you use awifi connection, it is also possible that your neighbors are using your network. If that indeed is the case, you need to make sure that wireless network is properly secured.


3) Internet Connection not available or is slow: If suddenly, your internet connection has stopped working or has become extermely slow, it is possible that a malware is the cause. However, problems with your internet service provider could also be the cause of such issues. 

4) Annoying Popups or Redirection to Strange Websites: If there has been an increase in the number of annoying popups while browsing the internet or your web browser redirects you to a different website from the one you wanted to visit, a virus or adware might be the cause. 

5) Computer won't boot: If your computer has suddenly stopped booting, it is possible that some malware has modified your computer's system files. In such a situation, re-installing or repairing your operating system might be the only solution. 

6) Slow Computer: Some viruses are designed specifically for this purpose. Malware programmers achieve this by designing viruses that increase your CPU's usage level to 100%. If on running the Task Manager, you find that your CPU's usage is constantly at 100% level, a malware might be the cause.


7) Programs start automatically: Some viruses and adware automatically start strange programs on your computer in order to show unwanted advertisements or simply to frustrate users.

8) Unusual File Associations: Some viruses change .exe or other file associations which prevents these files from opening. Some viruses also do this to automatically start themselves when a file of a particular type is started. 

9) Security Software Disabled: Most malware disable antiviruses and firewalls to prevent themselves from being detected. If only a single software stops working, it might be a specific software failure issue. If it is a general trend and almost every security software is facing this issue, a virus infection is most likely. 

10) Weird Behaviour: If your computer automatically starts sending emails or opens strange applications randomly or does things different from its "normal" behaviour, your computer is most likely compromised by malware. 

Share:

Sunday, 12 June 2016

How to Add the Facebook "Like" Button to Blogger or WordPress

How to Add the Facebook "Like" Button to Blogger or WordPress

Facebook is currently the largest social media network on the Internet. Odds are your readers have a profile and can immediately start sharing your content with their friends and family. So, how can you get your readers to sing your praises without begging them to do so? Simple. Install the Facebook “Like” button on your blog.

When visitors to your blog click the "Like" button on your post, they share your content on their Facebook wall—instant advertising. You want more readers, more site traffic, and more exposure? This is a great way to do it.


Thankfully, Facebook has made adding the "Like" button to a webpage incredibly user friendly. You don’t need to be coding guru to install this!

For Blogger Users

Open your blog's dashboard.Click on Template.Click on Edit HTML.Click on Proceed when a warning telling you that "Directly editing HTML may affect the way some features work and is only recommended for advanced users." is displayed.Check Expand Widget Templates.Find this code using your browser's find function "<div class='post-body entry-content'>"Copy and paste the code given below right after it.

<b:if cond='data:blog.pageType == &quot;item&quot;'><iframe allowTransparency='true' expr:src='&quot;http://www.facebook.com/plugins/like.php?href=&quot; + data:post.url + &quot;&amp;layout=standard&amp;show_faces=false&amp;width=100&amp;action=like&amp;font=arial&amp;colorscheme=light&quot;' frameborder='0' scrolling='no' style='border:none; overflow:hidden; width:450px; height:40px;'/></b:if>

Click on Save Template.

For WordPressThe three ways to add the Facebook “Like” button to your blog are:
1. Going directly to Facebook
2. Using a plugin
3. Manual coding

Going Directly to Facebook

Facebook has its own tool for creating a Like button using Extended Facebook Markup Language (XFBML). The Like button creation page can be found at Facebook's Developers page.

Benefits:
XFBML was developed to work specifically with Facebook so it has some great bells and whistles, including real-time reports on when users click the Like button and providing users with the ability to add comments when clicking the button.The knowledge that your code will be correct.

Using a WordPress Plugin

WordPress Plugins are strings of code that have been created to expand the functionality of the software application. You can choose from hundreds of different WordPress plugins to add a Facebook Like button to your blog. The best approach is to review the documentation and user ratings of a plugin before adding it to your blog. However, keep in mind that a 3rd party plugin may limit the customization you can apply to the appearance and location of the Like button on your site. One such plugin can be found here.


Benefits:
Don’t have to deal with code at all.Depending on the plugin you choose, the Like button could be bundled with a number of other social buttons, minimizing the amount of time and effort you have to put into tracking down buttons for each service you want to connect to.

Manual Coding

If you have experience with PHP code editing, you can manually add the Facebook Like button to your WordPress blog. If you don’t know how to enter code but would like to learn how, WPBeginner has an excellent tutorial. 

Benefits:
Offers the most control and customization of how buttons/social information displays.

All bloggers should consider installing the Facebook Like button on their blog. It doesn’t take any longer than 20 minutes to install, and it provides a quick and easy way for your readers to share your content.

Share:

5 Tips to Improve Your Blog

5 Tips to Improve Your Blog

Just about anyone can blog. But not everyone can blog well. There are several factors that go into setting your blog apart from the millions that are out there competing for attention. Here are 5 tips that you can use to make sure that blog stands ahead of the crowd:-

1. Self-host
Self-hosting your own website is one of the easiest ways to give your blog more credibility. It’s a lot easier for readers to remember a website that is sturdytricks4u.com over sturdytricks4u.blogspot.com. It also shows that you take your blog more seriously than someone that is utilizing a free blog site. And these days, it’s relatively cheap to host your own domain name. HostGator, Dreamhost, and Bluehost are three hosting companies that charge you about $10 a month (or less!) to self-host your website. You can even add a custom domain in most free blogging platforms if you don't want to move away.

2. Promote via social media sites
Facebook and Twitter are two great resources when it comes to promoting your blog. You can create a fan page on Facebook where you can link to your blog site and keep your readers engaged as well as grow your readership. Facebook is such a huge social media resource with the ability to reach millions of potential readers… why wouldn’t you want to take advantage of that? The same goes for Twitter, where you can post links to your current (and past) blog posts and also find different chat groups to participate in. Participating in chat groups is a great way to find people with the same interests as you. You don't have to be limited to just Facebook and Twitter. There are many websites you can be active on.


3. Headlines
You should write strong headlines that easily define what you are going to be talking about in your post. This not only peaks a readers interest, but also allows your blog to be more searchable. Strong doesn’t necessarily mean something with flair though, it means something direct that immediately identifies what readers can expect to find in your post, and that will pop up in a search engine when someone types in a particular topic.

4. Write well
Readers can tell the difference between a post that has obvious time and effort put into it and one that is just slapped up to get something out there. Put time into what you’re posting about. People appreciate posts which are original and well thought out. 

5. Layout
Your blog layout should be clean and easy to navigate. The design should be visually appealing without being overwhelming. No one wants to have to guess on where to find information. You should have a search bar where people can easily search topics and archives that readers can look through to see what else you’ve written. You should also include a contact page so that it’s easy for others to get in touch with you if they have questions or comments about something you’ve written, or want to get in touch with you about a potential business deal. 

By putting these tactics into play you should be able to market your blog in a more effective way and increase your readership. It may take a little time on the forefront, but you will reap the benefits of these efforts in the end.

Share:

Windows 7 Tips, Tricks and Shortcuts to Increase Productivity

Windows 7 Tips, Tricks and Shortcuts to Increase Productivity

Windows 7 is not a new operating system, but it is new to many users. Windows 7 has several interesting new features that make this OS better than previous Windows versions. These tips for Windows 7 may not make you an expert, but they should make your experience with Windows 7 much more fun and productive.

Shake it up 

Windows 7's "shake" feature allows you to minimize all the windows on your desktop in only one step, leaving only the window you are working in. This is great if you often run multiple programs at once.
To use this feature, click and hold the title bar of the window you want to keep maximized. At the same time, use your mouse to shake it back and forth quickly. All the other windows will then minimize to the taskbar. If you want to get those windows back, just click on the tile bar and shake it again.

You don’t have to "shake" to do this. If you want to make this feature less fun, you can press the Windows Key and Home Key simultaneously.
  
Customize your taskbar

You can rearrange your taskbar buttons quite easily. You just drag an icon to where you want it to be. You can drag in icons from applications, the start menu, the desktop and pretty much anywhere else you can find them and “pin” them to the taskbar. If you get sick of an icon you can right click on them and “unpin” them.


Use XP mode

There are lots of folks with old, yet important, software that isn’t compatible with this newer operating system. Thankfully, Windows 7 comes with “XP Mode,” which is essentially a virtual copy of this old OS that you can run on your desktop. This won’t work for all Windows 7 users however; only those with hardware virtualization built-in to their systems (and turned on) can use this feature.


Shortcuts!!!!
This is probably one of the most exciting new features for power users. If you are not a power user, you could turn into one soon with shortcuts. These are just some of the new shortcuts that can make your experience better and more productive with Windows 7:

- In Windows Explorer, you can bring up a preview pane on the right side of a window with ALT + P
- You can automatically open a new Explorer menu to show your libraries folder with Windows + E
- You can cycle through all open programs with the Taskbar’s peek menu by using Windows + T
- The Magnifier lets you zoom in or out on your entire desktop or even just a part of your screen. This feature only works when Aero desktop is enabled. You can activate the Magnifier by pressingWindows + (plus key) or Windows + (minus key)
- If a window is not maximized, you can fill your screen with it by pressing Windows + UP
- You can minimize an active window by pressing Windows + Down


Conclusion
These are just some tips for Windows 7. There are plenty more new features and shortcuts to explore. Hopefully these tips will make you more productive and let you have more fun with Microsoft’s most current operating system

Share:

Command Prompt Tricks, Hacks & Codes

Command Prompt Tricks, Hacks & Codes

Command Prompt is one of the most powerful tools in Windows; but sadly, it is also the most ignored one. Things were not always like this; but with the advent of GUI based operating systems, people started feeling that computing through command based tools was boring. This ultimately lead the command prompt into obscurity. 

However, the command prompt is not useless. In fact, it can be pretty useful. This article provides some excellent tricks, secrets and hacks that will make you realize that the Windows Command Prompt is not only useful but also a tool that you should definitely give more respect to.

1-Watch ASCII version of the Star Wars Episode IV movie
Surprised yet? You can watch an ASCII version of the full Star Wars Episode IV Movie right in your command prompt window. Just open command prompt, type a small code and the movie will start playing immediately. Read the complete instructions here

2- Create Matrix falling code effect
Have you watched “The Matrix”? Of course, you have. Then, you already know what I am talking about. In case you still don't know what I mean, take a look at this image! You can create the same effect in command prompt using just a few lines of code. Head over to this post for instructions.


3- Make Folders that you cannot delete
Are you tired of accidentally deleting important folders? Well, if you are, you can learn how to makeundeletable folders here.

4- Shutdown your computer giving a funny reason
What if your computer shuts down saying that it is tired and doesn't want to work anymore? It would be fun, wouldn't it? You can do so by reading the instructions here.

5- Know your IP address, DNS Server's address and a lot more about your Internet Connection
Command Prompt can even let you know your IP address. Just type ipconfig/ all in the command prompt and press Enter. Along with your IP address and DNS servers, command prompt will also return a ton of information like your host name, primary DNS suffix, node type, whether IP Routing ,Wins Proxy, and DHCP are enabled, your network adapter's description, your physical (MAC) address etc . 

6- Know if your neighbours are stealing your WiFi connection

Command Prompt can let you know if someone is connected to your Local Area Connection and using it. Just follow the steps:- 
1) Open your browser and visit http://192.168.1.1 or http://192.168.0.1 depending on your router. 
2) Find the tab that mentions “Attached Devices” or something similar.
3) Find the computer name, IP address and MAC Address (sometimes called Physical Address or Hardware Address) of your computer using the previous trick.
4 )Compare it with those displayed by your router in Step 2. If you notice some strange devices, then your neighbour has been sneaking in on your internet connection and it is best to add a password.

7- Know if someone is hacking your computer/ Trace a Hacker

Want to know if someone is hacking your computer? Command Prompt can help you find if someone you don't know is connected to your computer stealing private data. Just execute netstat -a and the command prompt will return a list of computers that your computer is connected to. In the results returned, Proto column gives the type of data transmission taking place (TCP or UDP) , Local address column gives the port with which your computer is connected to an external computer and the Foreign Address column gives the external computer you are connected to along with the port being used for the connection. State gives the state of the connection (whether a connection is actually established, or waiting for transmission or is “Timed Out”).

These tricks work on Windows 8.1, Windows 8, Windows 7, Windows Vista, Windows XP and all previous versions of Windows

Share:

How to Increase Firefox Speed, Make Firefox Faster

How to Increase Firefox Speed, Make Firefox Faster

Mozilla Firefox is one of the most popular web browsers in the world, and for good reason. In addition to it being free, Firefox provides a reliable and secure internet surfing experience that many people prefer over other browsers. But like those other browsers, Firefox’s speed can sometimes begin to deteriorate. When this happens, it might take you longer to load certain webpages or download certain files, which can be quite frustrating. If your Firefox speed is suffering, the following tips and shortcuts will help you increase your speed and get Firefox back to normal in no time at all.


Quick Speed Tricks

There are a few quick tweaks that can really increase the speed at which Firefox runs. First of all, you will want to open your Firefox browser. Go up to the address bar and type in "about:config," minus the quotation marks, of course. Once those words are typed, hit enter. Next you want to type "network.http" in the filter bar. When the settings pop up, double-click to change the "network.http.pipelining" setting to true. This should increase your browsing speeds, but may not work if you are running on a proxy server. If you are indeed using a proxy server, you should set "network.http.proxy.pipelining" to true as well by double-clicking on it. After that, change "network.http.pipelining.maxrequests" to 8. Changing this number to 8 will allow Firefox to load more than one item at once when you go to any given webpage.

For the next speed tweak, you will want to stay in the "about:config" menu, just like in the prior tweaks. Right-click anywhere in the window, select "new," then "integer" from the drop-down menu. Call the preference name "nglayout.initialpaint.delay," then change the value to the number 0. Adjusting this setting will lower the amount of time Firefox waits before displaying a webpage’s content. There are also many other settings that can be tweaked in the "about:config" menu. Some are very advanced and should only be altered by users who are very familiar with Firefox's settings.

If you have many add-ons installed, Firefox can take a lot of time to start. To make Firefox start quickly, remove the add-ons you are not using.

Other Firefox Shortcuts


Some handy shortcuts can make your Firefox browsing experience a bit speedier. On your keyboard, hitting the spacebar while browsing will allow you to scroll down. Holding down the shift key plus the spacebar will do just the opposite and scroll your page up. Since Firefox is well known for its tabbed browsing, it would only make sense that there would be a shortcut for opening a new tab. To do this, just hold the control key and the letter "T." Hitting the "F5" key will reload any webpage for you. Holding control plus tab will take you to the next tab. Lastly, holding down the alt key plus the home key (above the numbers on your keyboard) will take you directly to your home page.

There are a few other shortcuts that exist for Firefox as well. If you use bookmarks, giving them keywords will allow you to access them much quicker. All you have to do is go to your selected bookmark and right-click on it. Choose "properties," enter an easy-to-remember keyword in the keyword field, then save it. When you type that keyword in your normal address bar, your bookmark will appear.

Also, when you wish to access a specific site on your computer, do not worry about typing the complete URL in the Firefox address bar. If you simply enter in the name of the website, such as "Google," then press control plus enter, the rest of the address (www and .com) will be filled in for you if the website has a .com domain. If the website has a .net domain, press shift plus enter. For .org websites, press control plus shift plus enter. Although these shortcuts can take some time to get used to, they can really save you time and make it easier to surf the web.

If you are having issues with your Firefox speed, take a few minutes to familiarize yourself with these tweaks and shortcuts. Once you see how easy it can be to increase your Firefox speed, you will be glad you took the time to check them out.

Share:

Create & Share Powerpoint (PPT) Presentations Free Online

Create & Share Powerpoint (PPT) Presentations Free Online

PowerPoint presentations are often used by many people in the business world as a good way to present ideas and get your points across through visuals. Thankfully, there are a good amount of websites out there that will allow you to create and easily share your presentations with your colleagues and clients whether they are in the next office over or across the globe. Here are some of the best sites for making and sharing presentations quickly, effectively and at no cost at all. 

1) Prezi 
This unique and original presentation tool does not use slides like PowerPoint. Prezi tells your story on a single canvas with moving content appearing and disappearing off the canvas to create an interesting and very fluent presentation. The website allows you to take your PPT presentation and convert it into a Prezi if you want to try something new with your visual aids. You can also start from scratch and make a unique Prezi project to share.

2) Google Docs
Sharing your presentation has never been easier thanks to Google Docs. All you have to do is use the Google Docs Viewer, which allows you to upload your presentation and then generates a link that you can share with whomever you want to see the PowerPoint presentation you have made.

Google Docs is an all-encompassing site that can replace just about any Microsoft Office program, including PowerPoint, to make your original presentations even when you don’t have PowerPoint installed on your computer.

3) SlideRocket 
“You’ll never go back to PowerPoint” is SlideRocket’s motto. Make your own presentations or import your existing PPT project and then make improvements to it with the extra features the site offers. Then share your new and improved presentation with the folks at work.

4) Zoho Show 
Make your presentations from scratch using the Zoho interface, or upload an already existing PowerPoint presentation and then either touch it up or just share it with your collaborators.

5) Empressr 
Empressr media presentation tool lets you take your PowerPoint presentations, upload them, and then enhance them before you share. Making new presentations in Empressr can also yield great results, because it gives you the option of adding not only photos and words to your presentation, but audio and video content as well. 

Guest Author: David Lazar is a blogger at PdfConverter.com. With a background in journalism, he enjoys writing about and following all of the latest trends related to technology and new media.

Share:

Shutdown Your Computer or a Remote PC via Command Prompt

Shutdown Your Computer or a Remote PC via Command Prompt

Most of us shutdown our computers using the power button given in the Start menu. Some of us use the physical power button on our machines. Very few people actually use other means of shutting down a computer and even less is the number of people who use the command prompt to shutdown a computer.

A reason for this is that most of us don't know that the command prompt can be used to not only shutdown, restart or log off our computer instantly but also to shutdown a remote computer provided you have administrative access. It can also be used to hibernate a computer and give a comment containing the reason for shutdown. This post will show you how to do all this.

Required
A computer running Windows (XP, Vista, 7, 8 or 8.1) with the command prompt working perfectly, i.e. not disabled by a virus.

Initial Steps 
1) Press Windows Key + R.
2) Enter CMD and press Enter.

This will start the command prompt. Follow the instructions below depending on what you want to do.

Shutdown Local Machine (Your Computer)
Type "shutdown -s" without the quotes in the command prompt and press Enter. Shutdown is the command being executed and the switch -s tells the computer to shutdown.

Restart your Local Computer 
Type "shutdown -r" in the command prompt and press Enter. In this case, the command switch -r is telling the computer to restart after shutdown.

Log Off the Current User
Type "shutdown -l" in the command prompt and press Enter. The -l command switch tells the computer to log off.

Shutdown a Remote Computer
Type "shutdown -s -m \\name of the computer" in the command prompt and press Enter. Replace \\name of the computer with the actual name of the remote computer you are trying to shutdown. As mentioned earlier, you must have administrative access to the computer you are trying to shutdown. To know if you have administrative access, press Windows key + R and then type the name of the computer and press Enter.

Note: If you don't remember the name of the remote computer, you can look for it by opening a list of all the computers you are connected to by executing "net view" in command prompt.

If you can connect to the computer, you will be asked to login with your username and password. Upon entering them, a window will display the list of all the directories available to you. This should help you know whether you can or cannot shutdown the remote computer.

Hibernate a Local Computer
Type in "Rundll32.exe Powrprof.dll,SetSuspendState" without the quotes and press Enter. Your computer should hibernate, if it does not, then you must enable hibernation to do this.

Shutdown your or a remote computer after a specific time
Type "shutdown -s -t 60" to shutdown your computer after 60 seconds. Upon executing this, a countdown timer displaying a warning message will be shown. This command uses the -t command switch followed by a variable (which is 60 in this case) which represents the number of seconds after which the computer will shutdown.

Display a Message containing the reason for shutdown
Type shutdown -s  -t 500 -c "I am tired. I don't want to work anymore." (with the quotes) in the Command Prompt and press Enter. The -c switch is used in the code to give the reason for shutting down and what is followed in quotes will be displayed in the dialog box as the reason. This can be used to display all sorts of funny messages. One example :-

Skynet has become self aware. John Connor did not stop me. You can not use your PC anymore.

Stop a System Shutdown
Type "shutdown -a" and press Enter. This will stop the system from shutting down if the countdown to shut down has not reached 0.

Share:

YouTube Tricks, Tips & Secret Features You Might Have Missed

YouTube Tricks, Tips & Secret Features You Might Have Missed

YouTube, the extremely popular video sharing website averaging more than 3 billion page views per day needs no introduction to its fans who spend a considerable amount of their time watching and sharing videos on it. While most of these users know every nook and corner of this website, there are some features that are hidden deep within, in a manner that only few of the most experienced users seem to know about them. This article contains some such features, tips and tricks.

YouTube MySpeed 
Are YouTube videos taking too much time to load on your internet connection? Visit the YouTube MySpeed page to find your video streaming speed and compare it with the average speed of your ISP, your city, your state, your country and the world.

YouTube Disco
YouTube is all set to replace your music players with YouTube Disco. This music discovery project allows you to find the videos of your choice, create a list of them and then easily watch them without having the need to choose a new video after the one you are watching is finished.

YouTube Editor
Do you edit your videos before uploading them to YouTube? Now, you don't need to because it lets you to do all of that online with YouTube Editor; well not all of that but it at least lets you combine, trim and rotate videos. The best part about YouTube Editor is that it allows you to find copyright free music that you can add to your videos. It also offers some comparably advanced features like stabilizing shaky videos and inserting transitions.

YouTube TV
YouTube lets you watch the videos of your choice but have you ever wanted to just sit back and enjoy watching videos just like you watch television? If you have, then YouTube TV can be of help. YouTube TV plays high quality full screen videos tailored to your choices (if you are signed in to your Google account). If you are not signed in, you can choose a category to watch videos from, watch featured videos and even search for the video of your choice. You can then connect your TV to your computer to seamlessly enjoy TV, YouTube style.

YouTube Leanback

Set default video playback quality
Are you annoyed at manually changing the quality of every YouTube video you watch? Now you don't need to, because YouTube has an option that automatically lets you select the quality of videos you see. If you have a slow connection, you can select the option of never playing high quality videos. You can also select the option of showing captions and annotations automatically.

Watch Videos blocked in your country with a URL trick
If the URL of the video that is blocked in your country is youtube.com/watch?v={video-id}, you can access it by going to youtube.com/v/{video-id}. As an additional advantage, you will be able to view the video at the full size of your browser window.

Link to a specific time in a video
If you want to link to a video at a specific time, you can add #t=XXs to the URL where XX is a variable which represents the number of seconds after which the video will start.

Play videos in slow motion
Press the space bar while a video is being played to play it in slow motion.

YouTube Live
Ever wanted to broadcast your videos live on the internet? YouTube Live lets you do just that. YouTube Live supports larger production than Hangouts on Air. However, to broadcast videos live, your channel must be in good standing.

Broadcast live events on YouTubeCreate a feed of almost anything on YouTube
Just go to the YouTube Data API page and build a custom feed for yourself. However, there is a problem with the URI generated for specific categories as "{http://gdata.youtube.com/ schemas/ 2007/ categories.cat}" is also added to it. Remove this and the URI is good to go.

Find out what is popular on YouTube
Want to find the best videos on YouTube? Use Popular on Youtube channel to find what other users are watching, discussing and favoring. You can select a particular category to determine the best videos in that particular category. You also have the option to play all the videos that are popular right now.

Legally Watch Full Length Movies and TV Shows on YouTube
YouTube has a dedicated page to allow users to watch full-length ad supported movies for free. Movies are classified based on their genre and are offered in full HD quality. Movies are uploaded by the creators for the purpose of creating another source of revenue for themselves as Google gives them a portion of the advertising revenue. A similar page exists for TV shows. These two pages are country specific and may or may not be available in your country.

YouTube Easter eggs

For Star Wars and Star Trek fans
If you are a Star Wars fan, then there is some good news for you. YouTube has an easter egg just for you guys. Search YouTube for "use the force, Luke" to warp your screen. Star Trek fans need not be disappointed as there is an easter egg for them as well. Searching YouTube for "Beam me up, Scotty" reveals it.

YouTube Snakes Easter egg
You can play the classic Snakes game while watching any video in your browser. Just pause a video, hold the left arrow key for 2 seconds and while still holding it, press the Up arrow key. This only works in the new YouTube player on videos played on YouTube.com.

do the Harlem shake
Search YouTube for "do the Harlem shake" and the entire page will shake violently with the song "Harlem Shake" by Baauer being played in the background.

Share:

How to Move a Blogger Blog to Your Own Domain: Tips and Tricks

How to Move a Blogger Blog to Your Own Domain: Tips and Tricks

What a week this has been for this tech blog! I somehow couldn't manage to do so because of the fear of losing search traffic.

Google's recent move to redirect blogspot.com to country specific sub domains helped me solidify my decision to the extent of finally moving. I made a lot of other changes as well and have listed as much of them as possible as they might help some of you who are also planning to make the move. I have listed them in the order in which I made them.


1) Registered sturdytricks4u.com.

2) Changed my domain's settings to hide personal information from being displayed in the who is database.

3) Modified my domain's CNAME and A records to correctly point to Google's servers. Check this page from Blogger for details regarding this step.

4) Generally, it takes some time for your domain registrar to completely update the settings mentioned above. So, if you immediately point your new domain to your blog, users will see a 404 error. To avoid this, I created a new blogspot blog and modified its settings to point to my new domain.

5) When my domain correctly started loading the temporary blog, I modified this blog's settings to link it to the new domain. Now my new domain was correctly loading my blog. While doing this, I made sure to select redirecting the non www version to the www one.


6) Downloaded my blog's template and opened the downloaded XML file in Wordpad. I then used Wordpad's Find and Replace function to replace each occurrence of www.sturdytricks4u.blogspot.in with www.sturdytricks4u.com and uploaded the modified template. This automatically changed all navigational links to use the new domain.

7) Some widgets still had links pointing to the blogspot subdomain. I changed them manually.

8) Went to Google Webmaster Tools, added my new domain and submitted the full sitemap. Normal Blogger feeds show only 20 URLs, so in order to submit all the URLs, I submitted a custom queried feed that includes 500 URLs.

Normal Feed: /atom.xml

Feed I Submitted: /atom.xml?redirect=false&orderby=updated&max-results=500

9) Bing also brings considerable amount of traffic to this blog. So, I added the new domain to Bing Webmaster Tools and submitted the same sitemap.

10) Blogspot uses 301 permanent redirects to redirect visitors to new domains. This should have normally allowed Google to immediately index my new blog's URLs but it did not. So, I resubmitted my old blog's complete sitemap in Google Webmaster Tools. As the Blogspot blog had some authority in Google, GWT quickly processed the sitemap and immediately noticed that all those posts had moved to the new domain. This notified Google to index my content under the new domain and after almost 12 hours, my old blogspot URL's started getting replaced by the new ones.


11) Notified readers of the move on Facebook and Twitter.

12) After making the move, my search traffic is way lower than normal. This should change and traffic should return to normal once search engines completely transfer my Blogspot subdomain's trust and authority to this new one.

Some other changes I made

1) Used Feedburner's MyBrand feature to transfer my FeedBurner feed to my own sub-domain.

2) Modified my social profiles to link to my new domain.

3) Earlier, my about page and categories on this blog were simple posts that included dates in the URL. This made them look ugly, so I shifted these to independent Pages and canonicalized the old pages to new ones.

Some Noticeable Benefits
It is too early to say this but ever since I moved to my own domain, the subscription rate has gone up considerably. It has also increased the percentage of users who are completing the subscription process.

Share:

Popular Posts

Text Widget


Enjoy

THANK YOU FOR VISITING


Hello friends ! This is Sourav .... Welcome in my world......✌✌

Copyright powered by sturdy or..... Powered by Blogger.

Featured post of sturdy

How To Add All Facebook Friends In One Group - Full Script

How To Add All Facebook Friends In One Group - Full Script Hello my friends today we are here to share an awesome trick which will help you...

Contact Form

Name

Email *

Message *

Translate

Translate

Images

Search This Blog With Sturdy

Who is the best?

Popular Posts