Hello friends ! This is Sourav .... Welcome in my world......✌✌

Sunday, 12 June 2016

Recover Windows Password With Free Password Recovery Tools

Recover Windows Password With Free Password Recovery Tools

There are times when you forget your Windows password or someone changes it without your knowledge. In such situations, you will be locked out of Windows. To regain access, you can use some password recovery software to recover your Windows password. This article contains a list of some such password recovery software.

Note:  Most of these software are available as Live CD's. (For non technical readers, a Live CD is a compact disk that contains a bootable operating systemthat you can use from the CD itself, without having the need to install it.)

Ophcrack
Ophcrack offers one of the best free password recovery solutions in the market. Ophcrack comes in two versions: a stand alone installer and a Live CD. The stand alone installer requires you to additionally download separate rainbow tables whereas the Live CD already has them. As the stand alone installer uses about 1.5GB of rainbow tables, it offers much better recovery. However, the download size is certainly an issue. Also, the Live CD version is a bit easier to use for cracking passwords


So, I will discuss only the Live CD version. You must choose the right version of Ophcrack Live CD for your operating system. If you use Windows XP, the download (Ophcrack XP Live CD) is nearly 415MB whereas for Windows 7, Windows Vista and Windows 2008, it (Ophcrack Vista Live CD) is about 495MB. Ophcrack may be identified as a virus by your anti-virus software. That is a false alert and should be reported to the antivirus company.

To crack passwords with Ophcrack, download the iso file for the appropriate Live CD and burn it on a compact disk using an image burning software. If you use Windows 7, you can use your OS's inbuilt image burning software.

Then boot the computer whose password you wish to recover using that disk. Ophcrack is fully automatic and you don't need to do anything from your side. It will automatically detect users and start the password recovery process. Then, it will display their passwords on the screen. You can note them for logging in to the locked account.

Ophcrack recovers passwords nearly 99 times out of 100. Ophcrack is limited to recovering passwords upto 14 characters.

PC Login Now
If you mind downloading large amounts of data Ophcrack needs, then PC Login Now is an excellent alternative. In addition to its smaller size, its password recovery is one of the fastest and the easiest I have seen. However, PC Login Now does not actually recovers your password. It resets it.


To get started, you will need to download a nearly 60MB exe file from the PC Login Now website. Open the downloaded file to extract the ISO image of the Live CD. Burn the ISO file to a compact disk and then, boot your computer using the burned disk. PC Login Now will automatically load. Follow the on-screen instructions to choose your operating system and then the username whose password you wish to reset.

Then, choose the Password is empty checkbox to remove your password. Then, PC Login Now will ask you to reset another user's password. Choose No and then OK to restart your PC. Use a blank password while logging in and you are good to go. PC Login Now works on Windows 7, Windows XP and Windows Vista.

Offline NT Password Recovery & Registry Editor
Another open source recovery software that resets forgotten Windows passwords. Offline NT Password Recovery is also needed to be installed on a CD before working. However, there is also a version that can be installed on USB drives to create a bootable usb drive (if your motherboard supports it). Its small size (nearly 3MB) makes it an excellent alternative to other bulky recovery options.


It just has one con. Its interface being completely text based is not for the lovers of GUI based systems. To reset your password, just boot into your computer using the Live CD or the USB drive and follow the on-screen instructions. Your password will be changed to a blank one. This software works on Windows 7, Windows XP, Windows NT and Windows Vista. It also supports 64 bit versions of these Operating systems.

Cain & Abel
Cain & Abel is another free password recovery software. Unlike the software mentioned above, Cain & Abel needs to be installed on another administrator account on the computer containing the locked account. It also requires separate downloading of rainbow tables. Since, you can use inbuilt Windows functions to reset a password if you have access to a working admin account on the computer, I see no use for this software unless you are desperate about recovering your password. Cain & Abel works only on Windows XP.

Share:

Make Facebook Photos & Posts Private

Make Facebook Photos & Posts Private

Do you have private pictures of yourself or your family on Facebook which you don't want the entire world to see? This guide will help you change your Facebook privacy settings to only allow your friends or people you know to see your Facebook photos (and everything else you do). You can even customize the privacy settings of individual albums to share them with a small group of people like your co-workers or relatives.

There are three ways in which you can do this. Either, you can customize each wall post's or photo's settings individually, or set the preferences for specific albums or use a general setting for all posts and photos you have. 

1: Choosing an individual wall post's or photo's privacy settings

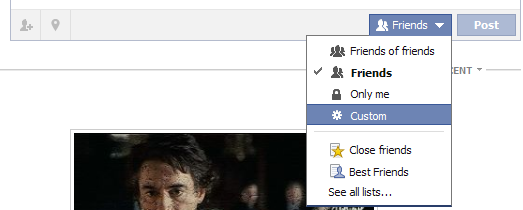
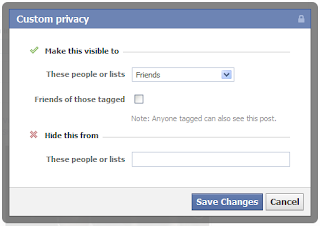
While posting your photo or post, click on the down arrow left to the post button. Select Custom from the drop-down menu. Using the pop-up, select who you wish to make a post visible to. You can select if you wish to show a post to friends, friends of friends or specific people or a specific list of people. 

Select Custom Privacy OptionsYou can even hide a photo from specific people or a list of people. This will be especially useful in situations where you don't want your colleagues to see a certain picture that makes fun of them or something similar. Normally, when someone is tagged in a photo, every friend of that Facebookuser gets to know about it. So, if you chose to make a photo visible to friends and someone is tagged in that picture, all their friends will see that image. To prevent this, uncheck the Friends of those tagged checkmark.


2: Limiting the Audience for an entire album

This is much similar to setting the audience for an individual picture. Just go to your albums, click on the Settings icon on the bottom right of the album whose privacy settings you wish to customize. Then select Custom from the drop down menu. The options Facebook offers are almost the same as those for an individual photo, however there is one difference.


All those people who are tagged and their friends would still be able to see the photos in your album. To prevent this, you will have to change the privacy settings of each individual photo.


3: Making all your Photos and Posts Private

This is the permanent solution against worrying about your Facebook content. However, it doesn't offer much customization options and should only be used if you are sure how you will use Facebook. This is a 2 step process and involves customizing the audience for your past posts as well as those you will make in future.

Step 1: Limiting Past Posts & Photos
Go to your Privacy Settings, and then go to "Limit the audience for posts you've shared with friends of friends or Public?." Then click on the "Limit Old Posts" button. In the pop-up, click Confirm. This is a permanent change and cannot be undone. However, all those tagged and their friends would still be able to see your posts. To prevent this, you will have to change each post's settings individually.

Step 2: Limiting Future Posts and Photos


While in the privacy center, click on "Who can see your future posts?" This will open a non-functional status update box. However, the privacy options that open when clicking on the down arrow right next to the post button are functional and act as global defaults for the content you post on Facebook in the future. Make sure to select friends if you only wish to share content with your friends. You can however, change this according to your needs; but for most people, friends would be the best option. You can further improve your privacy by selecting Custom and then unchecking the check box that appears next to "Friends of those tagged". This will customize your Facebook settings to show your Facebook activity only to your friends and those tagged.

You can also select who gets tagged in your content to further prevent your content from appearing in front of unwanted eyes. To do this, go to your Privacy Settings from the Settings icon located at the top right of the blue Facebook bar. Then, in Privacy Settings, click on Timeline and Tagging. Then under, "How can I manage tags people add and tagging suggestions?", select Enabled toreview tags that friends add to your posts.

Facebook's privacy settings take some time to adjust but once you are done, you will never have to worry about your content ending up in front of unwanted users

Share:

How to Edit PDF Files: Free Online & Offline Tools

How to Edit PDF Files: Free Online & Offline Tools

PDF, or the Portable Document Format is one of the most popular format for document sharing. Its popularity is mainly because PDF files are multi-platform (can be run on most devices without any change in formatting), smaller in size, can be opened on most devices with free software and are difficult to edit as they are "read only".


Despite PDF files being "read only" by default, there are certain tools and software you can use to change the contents of a PDF file for free without resorting to paid software like Adobe Acrobat.

Free Tools To Edit PDF files

Edit PDF Files Online
If you are looking for basic PDF editing (changing bits of text to hide your personal information or simply filling a form), you can try PDFEscape to edit PDF files right in your browser. It allows you to modify text, images and add annotations with the help of custom shapes and arrows. One of PDF Escape's great feature is its ability to password protect PDF files. It also allows you to hide text with its white out tool (this is different from deleting it). It even lets you edit password protected PDF files and add hyperlinks to web addresses. To use PDF Escape, all you need is a JavaScript enabled web browser.

2 step PDF Editing
This basically involves converting PDF files into another format and then editing the converted PDF file. After editing, you can use a PDF writer to reconvert the edited file back to PDF.


If your PDF file can be suitably edited as a Word document, you can use a PDF to Word converterfor instant conversion. Edit the converted file and then, you can use any free PDF writer to recreate a PDF file. If you have Open Office, you can use its export as PDF feature to create a PDF file from almost any printable document.

Multivalent Browser: Multivalent browser offers minimal PDF editing in the form of allowing to add annotations. It also contains several command line tools which allow for merging and compressing PDF files.

Edit Meta data of PDF files
Meta Data is the information that is associated with a PDF file. If you wish to change this information, you can use the free PDFMetaEdit to edit information like title, author name, bookmarks and other creation data of a PDF document. PDFMetaEdit can also be used to remove and add passwords (encrypt) to PDF files.

Advanced PDF Editors (editing text, images etc.)

The freeware tools mentioned above will be useful for most users with basic PDF editing requirements. However, if you have advanced PDF editing needs, the above tools will not be that useful. There are some advanced PDF editing tools available that are as good as most paid products. 

Open Office Draw

The open source alternative to Microsoft Office can also be used as an alternative to Adobe Acrobat. All you need is the PDF Import extension(older version here). Then you can use Open Office Draw to easily and quickly edit PDF files. With Open Office Draw's inline editing features, you can edit any PDF document as easily as you can edit a Word document. It also supports adding and replacing images, changing font size and color, replacing default font-family, adding annotations, charts, shapes, tables all through an easy to use interface. 

To load the PDF Import extension in Open Office, just open Extension Manager from the Tools Menu, click on Add and then select the location of the downloaded extension. For those of you who want a PDF Editor without any initial setup, LibreOffice, an Office suite descended from Open Office, has this extension included by default. If you don't mind the download size, Open Office Draw is simply the best free PDF editor available.

InkscapeInkscape is a vector graphics editor that allows you import and export PDF files. You can use Inkscape to select text, image or any other object on a PDF file and then change its position or even delete it. It also lets you do free hand drawing on PDF files and add annotations. While Inkscape offers some really good features, its complex interface makes it difficult for users to use it. Moreover, it only allows you to edit only a single page at a time. You can, however, convert these to a single PDF file using a PDF combiner.

PDFToolsPDFTools is a PDF management application that supports encrypting, decrypting (remove password), joining and splitting PDF files. Its Stamp feature can be used to add text and images over a PDF file. You can stamp to the location of your choice using the X and Y co-ordinates. It includes a PDF creator which can be used to create a PDF file from any XML document. It also supports re-arranging pages in a PDF file.

GIMPGIMP or the GNU Image Manipulation Program can also be used as a PDF editor. Just import any PDF file as an image or a layer, then edit it, and then use its export function to get a PDF file. The only downside is that like Inkscape, GIMP also allows you to edit only a single page at a time. You can, however, easily combine these to get a single PDF file using free software like the above mentioned PDFTools.

PDF-XChange Viewer: The free version of PDF-XChange viewer can be used to directly type text on PDF files. This makes this software a good PDF form filler. Its image stamp feature can be used to insert images directly on any PDF document.

PDFEditPDFEdit is a full fledged PDF editor for Unix-Like operating systems. Its downside is that it does not support editing protected or encrypted PDF files. PDFEdit has a beta version for Windows, but it didn't work for me

Share:

lock a Folder With Password Using Free Folder Protector

lock a Folder With Password Using Free Folder Protector

All of us have some files and folders that we consider private. They can be anything from our business documents to pictures of friends and family. These are files that we don't want other people using our computer to know about. As Windows offers no way to protect our private information, most of us get in awkward situations when these files are discovered by unwanted people.

Surely, you can store this information in a hidden folder. The only problem is that anyone can easily search the contents of a hidden folder using Windows Search itself.

The only viable solution is storing this content in a password protected folder so that only those people knowing the password of the folder can access it. There are many folder locking programs available online but the problem is that most of the good ones are paid. Even if you do manage to get a good free one, you will be looked at suspiciously when people see a folder locker in the list of your installed programs.

If you too find yourself in a similar situation, you can try Folder Protector, a password protector for Windows folders that is not only free but is also portable meaning that it does not need to be installed. Just click on the exe file and the program will start running. I have created this program based on suggestions and feature requests that I have received by email over the last two years.

Folder Protector

Folder Protector offers each user a protected folder that can only be opened by entering the password in FolderProtector. Unlike most security programs, Folder Protector is small in size (nearly 58KB) and does not show the folder that it is protecting. This gives an additional advantage that people who don't know the password do not have a target to try and hack their way into. As thesoftware is portable, you can hide it or even delete it after protecting your folder and no one will have a clue that it was used. Then whenever you need to access protected files, you can re-download the program from this page, enter the password and access your protected files.

Download Folder Protector

Download for Windows 8, Windows 7 and Windows Vista

Download for Windows XP

Important: 1) This program uses a simple method to lock files and should not be used to protect truly sensitive information. It is best to encrypt that kind of information.

2) Do not refresh your Windows when your folder is locked. Doing that will delete your files.

How to use Folder Protector?
When you run Folder Protector for the first time, the program will ask you for a password that you want to use. Enter a password that you can remember as this will be the password to your protected folder.


After entering the password, the program will open a folder named SecuredFILES. This is your protected folder. You can add all your private files in this folder. This folder is located at the Desktop. After adding all your files, you may close this folder. 

Then, you can use the menu in the program to lock your folder. To lock the folder, type lock as your action. After successfully locking the folder, FolderProtector will display that the folder is locked.


Unlocking the protected folder is easy. Just type unlock as your action. Then the program will ask you to enter your password. Upon successfully entering the password, the program will display the contents of your protected folder.

Changing the Password: Just type change as your action. The program will ask you for your current password. Upon successful entry of the current password, the program will ask for your new password and change it instantly.

Acknowledgment: This software has been made possible only through the suggestions of readers of this blog, especially Ernell Albert Galido for his idea of using a menu based interface.

Windows Compatibility: This program has been successfully tested on Windows 8.1, Windows 8, Windows 7, Windows Vista and Windows XP.

Share:

PC Security Tips : Make Computer Secure

PC Security Tips : Make Computer Secure

Here are some tips which will enable you to make your PC more secure.

Anti-virus

1. Never, ever turn off the resident protection of your antivirus even if it decreases performance. Upgrade if necessary.

2. Keep your virus definitions up-to-date. Use the automatic update feature of your anti-virus and try not to ignore the "Do you want to update now" message however often it might pop up.

3. Even if you update regularly and you have not seen any suspicious activity on your PC, do a deep scan at least once a month.

4. Always create an emergency boot disk and keep it in a safe place.


5. Run a deep scan in safe mode at least once every two months to kill viruses that would otherwise remain hidden.

Firewalls

1. If you are unsure about the alert displayed by your firewall, try searching it on the internet.

2. A firewall is a powerful tool that requires an understanding of how the program works and exactly what it is doing and whether it is secure or not. Reading the help files is extremely important in successful configuration of your firewall.


3. If you are running a third party firewall,be sure to turn off the Windows Firewall.

4. You can temporarily disable a firewall by right clicking the icon in the tray. This is handy when you know a site is one you can trust but your firewall is blocking it. But remember to re-enable it as soon as possible.

5. Read firewall notices carefully when they pop up so that you don't let a bad thing in or prevent good traffic.

Anti-Spyware

1. You should regularly check for updates. Enable the automatic update feature.

2. Remember to do a scan every now and then, or schedule scans if your program allows it. If you don't want to sit that long for scans to complete, use a single folder for all your downloads, then scan only that folder, Windows installation folder and the Registry. Alternately, you can do a quick scan if your program allows it.

Anti-Spam

1. Be patient with anti-spam software, it will get better over time.

2. Even if it looks that your anti-spam software is working great, periodically check the 'Spam' folder for good mail. None of the anti-spam software is perfect right now.

3. Don't give your anti-spam software too much rules, because it will not learn anything then. It is better if it learns on its own.

Share:

JavaScript Tricks: Edit Websites in Browser (Live)

JavaScript Tricks: Edit Websites in Browser (Live)

Imagine a world where you are a God and have ultimate control on what happens and more importantly, how it happens. Seems too good a dream. Now it has come true, at least for the online world.

Using this trick, you will be able to edit any webpage live in your browser as if it was a Wiki and change the details according to your wish. Yes, you read that right. You can edit Google or even Facebook for that matter right in your browser and that too without requiring any technical know-how or getting deep into hacking and cracking.

Here is an example picture demonstrating the Google Homepage edited by me to say that I own Google.


This is just an example. You can use it for anything like showing wrong traffic stats or for fooling people by showing that someone said something about them on Facebook or Twitter. It depends only on your creativity. But I would advise you to stay ethical and use it for entertainment purposes only.

(Mozilla Firefox does not support this. If you use Firefox, you can use the bookmarklets given at the end of this post. If you use Google Chrome and the code does not seem to work, precede it with "javascript:" without quotes.)

To use this trick, all you need to do is just copy the code given below and paste it in your address bar after you have opened the website you wish to edit. And start editing.

javascript:document.body.contentEditable%20=%20'true';%20document.designMode='on';%20void%200


You can capture a screenshot by pressing the Print Screen key or by using the Snipping Tool if you use Windows 7 or Windows Vista. If you wish to again make the website non-editable to give a more authentic look, copy and paste the code given below in the address bar after you are done editing (does not work in Firefox).

javascript:document.body.contentEditable%20=%20'false';%20document.designMode='off';%20void%200

Or, alternatively you can use the following bookmarklets by dragging them to your Bookmarks bar.

1.  Edit this Website

2.  Done Editing

The editing that you do will however be temporary as it is not server-sided. You can also save the modified website through your browser by File>Save. This works on all common web browsers including Chrome, Firefox, Opera and Internet Explorer.

Share:

Saturday, 11 June 2016

Useful Keyboard Shortcuts for Windows Computers

Useful Keyboard Shortcuts for Windows Computers

While most of us are already aware of obvious keyboard shortcuts like “Alt+F4” and “Ctrl+C”, there are some obscure shortcuts which most of us tend to overlook. These keyboard shortcuts are not only useful for the average PC user but for advanced users as well. This article contains many such amazing keyboard shortcuts which if used properly could save a lot of time and effort. So let's get started.

Windows key+D: This shortcut is the keyboard equivalent of “Show the Desktop”. It is useful for quickly minimizing every open window when someone walks in and you are doing some private work.


Ctrl+Shift+Esc: This shortcut directly starts the task manager. While Alt+Ctrl+Del was used to bring out the Task Manager in Windows XP and earlier versions, in Windows 10, Windows 8.1, Windows 8 and Windows 7, it just brings up the lock this computer screen.

Ctrl+Click: This shortcut is useful for opening a link in a background tab. This is useful when you have to load a page without leaving the current one.

Alt+Print Screen: takes the screenshot of the current active window as opposed to just Print Screen which takes the screenshot of the entire screen.

Shift+Click for Yes to All and No to All: If you have a lot of dialog boxes asking yes and no question, just shift+click Yes or No on one to yes all or no all.

Ctrl+C on an error dialog box to copy its contents: Suppose your computer is giving an error message and you want to copy its contents to send to the support guy, what do you do? Just press Ctrl+C while the dialog box is highlighted and its contents will be copied to your clipboard.

Ctrl+T: This keyboard shortcut opens a new tab in internet browsers.

Ctrl+Shift+T: Reopens the last closed tab.

Ctrl+Shift+N: This shortcut opens a new incognito window in Google Chrome.

Ctrl+Shift+P: Opens a new private window in Mozilla Firefox.

Alt+Enter after writing the domain name in the address bar of your browser to insert .com automatically.

Shift+Enter inserts .net domain name extension.

Ctrl+W: This shortcut closes the current tab in your browser quickly.

Ctrl+Backspace: This shortcut deletes the last word you have typed. It is useful in case you typed in a wrong word and want to delete it quickly.

Ctrl+Left or Right Arrow key: This shortcut allows you to move the cursor one word at a time instead of the default one character at a time.

Ctrl++: This shortcut allows you to zoom in web pages in web browsers. Useful when text on a web page is too small to read properly. Ctrl+Scroll wheel can also zoom in documents, file thumbnails and icons in Windows 10, Windows 8.1, Windows 8, Windows 7 and Windows Vista.

Ctrl+-: This shortcut does the reverse of the previous shortcut.

Ctrl+0: Reset the webpage's zoom.

Windows key+M: Minimizes all the open windows.

Ctrl+L: This shortcut allows you to quickly jump to the address bar of your web browser.

Windows key+Pause/Break: Quickly open the system properties dialog box. 

Ctrl+Shift+Delete: This shortcut opens the option to delete your browser's history, cookies, cache and other details that it stores while you browse the internet. This shortcut is extremely useful for the privacy conscious.

Windows Key+L: This shortcut locks your computer.

Ctrl+H: makes the history appear.

CTRL+B: Bold CTRL+U: Underline CTRL+I: Italic.

Alt+Select: This shortcut allows you to select rectangular blocks of text in Word processors, something that is not possible with simple select.

F2: Allows you to rename the selected file.

Holding Shift while inserting a device with removable storage prevents automatic run.

Ctrl+F: This keyboard shortcut opens the Find option in any program.

Ctrl+S: If you are working on a software and want to quickly save your progress, this shortcut will come in handy.

Ctrl+Home and Ctrl+End: Useful for quickly going to the top and bottom of a page.

Ctrl+P: Useful for printing the current page.

Space Bar: While viewing a web page in a browser, pressing space bar moves the page down.

Alt+Tab: Useful for quickly cycling between running applications. Press along with Shift to cycle backwards.

Ctrl+Tab: Cycle between tabs in your browser.

Ctrl+F5: Clears the cache and refreshes the current tab.

Shift+Right click: Open alternate right click options.

Alt+Double click: Open the file's properties. Alt+Enter can also be used for this.

These are some keyboard shortcuts that I found extremely useful. If you know some more useful keyboard shortcuts, do mention them in the comments

Share:

Convert any Video to ASCII using VLC Media Player

Convert any Video to ASCII using VLC Media Player

VLC is a video player with a lot of tricks. While you definitely would be aware about converting videos with it, the feature of converting any video to ASCII is one that is slightly less known. As ASCII version of movies like Star wars are very popular online, I think this feature of this amazing media player can be used to have lots of fun.

An example of a video in ASCII form
All you need to do is open any video and VLC will automatically display its converted form. To convert any video in ASCII, just follow the steps given below:-

1) Open VLC Media Player.
2) Click on the Tools menu and in the drop down list, click on Preferences at the bottom of the list.
3) Click on Video icon in the left sidebar.
4) Click on the drop down box next to Output.
5) Select "Color ASCII art video output" from the drop down list.
6) Click Save and restart VLC.

Older versions of VLC might require you to modify these settings under the Advance tab or All Settings tab. As VLC runs on a variety of OSs, this trick will work on any PC capable of running this media player. However, it is interesting to point out that older PCs having poor hardware will slow down and give a stuttered output

Share:

Speed Up a Slow Windows 10, 8, 8.1, 7 or XP Computer

Speed Up a Slow Windows 10, 8, 8.1, 7 or XP Computer

Having a slow computer is not something most users fancy, but that is what most of us end up with after prolonged usage despite having the latest hardware. Understandably, there are also a few of us who are trapped with a low-end PC and are forced to get as much out of it as possible. This article caters to both these type of users as it not only explains how to make your computer as fast as it was when new but also how to reduce the footprint of your system to utilize your PC's current system resources in the best possible way.

First thing first. Make sure your PC isn't infected by a virus, worm or other malware

Anyone who has used an infected computer will verify how painfully slow a computer becomes when infected by a virus. More tech savvy users will counter that an infected computer's speed depends upon the type of malware. To be honest, it does. However, based on my personal experience, I can say that while some malware are designed specifically for making computers slow and unresponsive, most malwares tend to decrease a computer's performance. 

If your computer is infected, the first thing you need to do is deep scan your entire hard drive to remove all traces of the virus. Also, scan your secondary storage devices to make sure that they are clean as well. Additionally, make sure to follow best security practices to avoid getting infected in the future.


Remove unused and unnecessary programs

Now that we are sure that your computer is not slow because of a virus, you need to get rid of all the unnecessary programs that you have installed on your PC. To remove these programs, go toPrograms in the Control Panel and uninstall your unnecessary programs one by one. If you are like most Windows users (including me) and are having a tough time figuring out which programs to uninstall as all of them seem important, follow this rule: If you have not used the program in the last month, it probably is unnecessary. It is better to uninstall that program given that you can reinstall it whenever required. It also is a good idea to remove all the useless software that came bundled with your computer. If you want, you can remove unused Windows features as well to further tone down your operating system.

Try faster alternatives to your everyday programs

If you use applications that require too much computing power to operate, you are better off replacing them with applications that do the same job as them but faster. Few resource hogging applications that you can replace are:-
1) Most resource intensive antivirus software can be replaced with the lightweight Microsoft Security Essentials.
2) Microsoft Office can be replaced with OpenOffice, an open source alternative that also has loads of amazing additions.
3) Adobe Reader can be replaced with the free Foxit Reader.
4) The newer versions of Internet Explorer (IE 10 and above) are less resource intensive. If you have been using an older version, it is time to upgrade IE or replace it with either Mozilla Firefox or Google Chrome. This will also give you faster internet speeds.

Remove unnecessary startup programs

Startup programs are the programs which start automatically each time a user logs on. Not only do they result in a slow startup, but they also run persistently, until you close them manually, continuously consuming valuable system resources (CPU and RAM) while they are running. So, disabling unnecessary startup items results in both a faster startup and a more responsive computer, as these applications not running continuously means more RAM and CPU will be available for the operations you perform on the computer.

To disable unnecessary startup programs, type msconfig in the search bar in Start menu (inWindows 10,Windows 7 and Windows Vista) and on the Start screen in Windows 8 and 8.1. On Windows XP, type this in the Run dialog box. This will start the System Configuration utility. Click on the Startup tab and disable all the applications that you think are not essential on your computer's startup. Restart your computer to see the changes. Keep in mind to not disable your security products as that will make your computer more susceptible to getting infected.

Restart your computer often

This is assuming that you continuously use your computer for long periods of time. Each time when you close a running program in Windows. it frees the memory that the program was occupying. However, it may so happen that some parts of the memory do not get freed which results in less system resources available to you to use which ultimately results in a slower PC. When you restart your computer, these occupied spaces in the memory get freed. Although, this memory issue has been somewhat fixed in recent versions of Windows, it still is a good idea to reboot your computer at least once a day.

Check your hard drive for errors

Over time, as you use your computer, chances are that some errors might creep in your hard disk which negatively affect your computer's performance. The best way to solve this issue is by using the inbuilt Disk Check utility available in all versions of Windows. To use it, execute chkdsk /r in theCommand Prompt. Remember to open the Command Prompt as an administrator. It might prompt you to restart your computer. Execute Y to restart your PC. The chkdsk/ r command scans your computer's hard drive for errors and recovers readable data. Depending upon the size of your hard disk, this step might take some time. This step might increase your computer's performance phenomenally if there are a lot of errors on your hard drive.

Make sure you have enough free space

System speed is not only dependant upon CPU and RAM. If your hard drive is above 95% full, you will notice that your system hasn't been running at the fastest speed. This happens because Windows require empty space for swap files to increase in size and also as space for temporary files. It is imperative that the more cluttered and filled a hard drive is, the more difficult it is to read. To solve this issue, delete unnecessary data or move it to external storage devices.

Repair protected Windows system files

As you use your computer, it is possible that one or more system files get damaged or get corrupted which might effect your system's performance in a negative way. Thus, it is important to check that all your system files are original and behaving as they should. The best way to check your operating system's files is through the System File Checker. To run the System File Checker, open Command Prompt as an Administrator and execute sfc /scannow. This command will check all your system files and if it finds that some of them are modified or corrupt, it will replace them with the original. This step can take anywhere between 5 to 15 minutes but is one that you should perform especially if your system has ever been infected by a virus.

Disable unnecessary visual effects

The visual effects that make your computer look beautiful also slow it down considerably. So, if you want to get the best performance out of your computer, you should disable all these visual effects. To disable these visual effects:-
1) Press Windows Key+R to launch the Run dialog box.
2) Execute sysdm.cpl.
3) Go to the Advanced tab in the following Window and click onSettings in the Performance section.
4) Then encircle Adjust for best performance. If you want to use visual styles and themes, check it (located at the very end of the list).
5) Click on Apply to apply the changes.

Disabling these visual effects could lead to a considerable improvement in your system's performance especially if you are on Windows 7 or Windows Vista and using the Aero interface without a graphic card.

Do not run multiple antivirus programs

Make sure that no more than one antivirus program is running on your PC. An antivirus's resident protection takes a lot of resources. So, having more than one antivirus program would bring about a significant reduction in your computer's speed.

Disable sound schemes

Whenever you perform an action in Windows, a sound is played to indicate it. Although it leads to a better user experience, it also contributes towards slowing your PC down. To make your PC a lean work machine, you should disable these sounds. To disable these, open Sounds from the Control Panel or alternately type mmsys.cpl in the Run dialog box. Go to the Sound tab and select "No Sounds" from the Sounds scheme dropdown list and click Apply.

Update Windows and make sure that you are using the latest drivers for your hardware

Having all the updates ensures that your computer is running the best possible version of your operating system and your hardware is being utilized by the best possible code. Also, an updated operating system makes you more secure against future intrusions by performance reducing malware.


Use a Registry Cleaner to keep your Registry in good shape

The Windows Registry is a place which keeps information about all installed programs and active system files on your system. Over time, as you install and uninstall programs, the Registry can get filled with useless entries which might increase its size making it difficult to read. This happens because most uninstallers don't remove the program's Registry entries during an uninstall. Also, the larger the Registry is on your computer, the more time Windows will take to start.

To solve this issue, use any free Registry cleaner to remove useless entries. Depending upon the number of entries in your Registry and its size, you might see a significant increase in your computer's performance.

Delete Temporary Files

Temporary files are stored in your computer as Windows operates. They are files that contain your recently accessed files list, log files, your internet history, form history, cookies and temporary internet files. Over time, the number of these files increases and cleaning them becomes important. You can use CCleaner (mentioned above) to clean them or the inbuilt Windows Disk Cleanup utility by executing cleanmgr.exe in the Run dialog box. You can also schedule a disk cleanup to ensure that it happens automatically.

Disable Windows Search Indexing Service

The Windows search indexing service scans all the files and folders on your system and stores information about them in a database to make searches faster. Naturally, this results in consumption of resources. If you don't use Windows Search often or are willing to trade faster searches for a faster computer (as you should), disable the indexing service. To disable it, execute services.msc in the Rundialog box. In the work area on the right side, locate Windows Search service and double click on it. In the following Propertiesdialog box, select Disabled from the Startup type dropdown and click OK. Restart your computer. Your searches will be slow but your computer will be faster than ever.

Check Device Manager to look for hardware conflicts

Open Device Manager to see that all the connected hardware are functioning properly. If you find a hardware conflict, take the necessary steps to resolve it. If the conflict cannot be resolved, disconnect the problematic hardware until you find a solution.

Change to High Performance power scheme

If you are running your computer on a battery and notice that it is running slow, change the power scheme to high performance to increase system speed. Keep in mind that it will increase the amount of power consumed by your computer. To change the power scheme, open Power Optionsfrom the Control Panel. You can directly search for Power Options in Windows 7, Windows 8, Windows 8.1 and Windows 10 from the Start Screen/Menu.

Check if your computer is overheating

If your computer is overheating, then it is possible that it is causing your computer to run slowly. This is because most modern processors slow down when the computer is overheated to allow the computer to cool down. 

To prevent your computer from overheating, make sure that the cooling fan works properly and that there is no dust clogging the air vents as it will prevent air flow which will result in poor cooling. Clean your computer's case with a light brush and place it somewhere where it can be effectively cooled by air. If you use a laptop, a cooling pad might be of help.

Defragment your hard drive

When Windows stores a file on your hard drive, it does not look for a single place to store your file as a whole. Instead, it stores the fragments of the file randomly, i.e storing them at whatever empty space it can find the quickest. Due to this, the fragments of a single file can be scattered all across a hard disk. A hard drive that has many files distributed like this is called as fragmented. Naturally, this results in slower file access times because Windows needs to find all these pieces and put them together (something like a jigsaw puzzle) before the file can be accessed.


This is what defragmentation corrects. When you defragment a hard drive, the scattered pieces of a file are put together and stored on the hard disk in continuous cells (assuming a hard disk to be made up of a large number of cells with each cell representing a particular storage space).

To defragment your hard drive, you can use the in-built Windows Disk Defragmenter utility. It can be searched on the Start Screen/ Menu in Windows 10, 8 & 8.1 and is located at Start>Programs>Accessories>System Tools in older versions of Windows.

Use ReadyBoost to increase the speed of your Windows computer

If you are running a computer that does not have enough RAM, using a flash drive with the ReadyBoost technique can and will give you significant improvement in speed. As with ReadyBoost, your flash drive becomes a cache that stores files that you might immediately require giving you faster access times than if those files had been stored on a hard disk. 

Keep in mind that ReadyBoost depends upon the condition of your flash drive and was intended to increase speeds of devices which were short on RAM. If you already have a sufficient amount of RAM, chances are that you might see very little to no improvement in speed by using it. 

Reinstall Windows

This is one of the more drastic methods and should only be used if all the methods mentioned above fail to bring any significant increase in your computer's speed.


If you haven't reinstalled Windows in a really long time, it is possible that because of constant use, the system has got bogged down with useless clutter in a way that no amount of tweaking will fix its condition. Then, reinstalling Windows is the only option.

Reinstalling Windows brings about a definite increase in speed but gives you a new PC without all your software and customization. Modifying it according to your needs will take a lot of time though but that is something you must sacrifice for a faster PC.

If you use Windows 10, Windows 8 or Windows 8.1, you can refresh your PC without affecting your installed apps and settings. To refresh your Windows 8 PC, open Update and Recovery by going toChange PC Settings from the Settings button that appears when you move your mouse pointer to the right side of your screen. Windows 10 users can directly search "Refresh" from the Start menu. Under it, click Recovery. Then under Refresh your PC without affecting files, click Get Started.

Upgrade to a solid state HDD

Although solid state hard drives are a lot faster for writing and reading data than older optical hard drives, their heavy price is something that keeps them out of the range of many. Still, if you do manage to get one for your PC, the change in speed will be immediately visible.

If all else fails, get more RAM

RAM or the Random Access Memory contains all files of the currently running programs that are immediately required by the computer. Accessing files from the RAM is much faster than doing the same from a hard disk. This means that more the RAM you have, more the programs you can run without compromising on speed. RAM upgrades do not cost much and are one of the best ways to speed up a slow computer.

Share:

Create Bootable USB Drives to Install (Almost) Any OS

Create Bootable USB Drives to Install (Almost) Any OS

With the advent of ultra portable laptops, optical drives are becoming a thing of the past. Although not having optical drives allows manufacturers to make lighter devices, it causes problems to users when they want to fresh install operating systems, as most of them are still available in the form of CDs, DVDs and downloadable ISOs. For users of these devices, the only option then remains is to use a flash drive to install the operating system of their choice.

Not surprisingly, there are also a few of us who prefer installing operating systems from flash drives for its faster speeds. There are also a few of us who prefer to keep live operating systems on our flash drives to access computers without having an OS by simply plugging in our devices.


With such a lot of users needing to create bootable USB flash drives, it appears imperative that OS manufacturers provide an inbuilt way to create them with each DVD and CD they provide. However, that is not the case with all operating system manufacturers.

In fact, most of the users are left hunting for third party applications that can create a bootable USB drive for their specific operating system. To add to a user's misery, the OS manufacturers that do provide an application for this make them OS specific (like the Windows 7 USB/DVD tool) and do not support ISOs and DVDs of other OSs. Some of them fail to work even if the original ISO/DVD is slightly modified (slipstreamed etc.).

Use Rufus to create bootable USB media

If you too are one such user looking for a solution, you can stop looking and try Rufus, an open source tool to create a bootable USB drive from any bootable ISO. 

Rufus is small in size (nearly 615 KB) and claims to be faster at creating bootable USB drives than most applications of its type. Rufus is also portable which means that you need not install this software to use it. Just double click on the executable file and the application will start working. Rufus also allows you to add fixes to use your bootable flash drives on older computers having BIOSs which do not support booting from them.

Strangely however, Rufus can only create bootable flash drives from ISOs meaning you need to have an ISO image of the CD or DVD of the OS of your choice. 

I do not think this should be too much of a problem considering how easy it is to create ISOs from DVDs and CDs.

How to use Rufus?

1) When you start Rufus, the first option that you will see is Device:. It contains all your connected USB drives. If you plug in a USB drive after starting Rufus, the drive you have connected will shortly be available here.

2) You will not need to modify the Partition Scheme and target system type, as the default choice is suitable for making the USB drive work on both UEFI and legacy BIOS computers. 

Rufus in Windows 8

3) Change the file system from FAT32 to NTFS from the dropdown menu. This is the file system with which your USB drive will be formatted with. Do note that older computers will not boot from a flash drive formatted as NTFS. Do not modify the cluster size. Enter the name you want for your USB device in the Volume label box.

4) Check the Create a bootable disk using checkbox if it is not already checked. In the dropdown menu next to it, select ISO image. Click on the button right to it to locate your ISO image.

Do note that Rufus will format your USB drive deleting everything on it before making it bootable. So, make sure that it does not contain any important data.

5) Click on Start to format your USB drive and extract all files of the ISO to it.

To install the OS, restart your computer and select your USB device as the primary boot option in the BIOS boot menu. 

Compatibility
Rufus works on all the latest versions of Windows and can be used to extract the following ISOs to a bootable USB drive:-

Arch Linux, Archbang, BartPE/pebuilder, CentOS, Damn Small Linux, Fedora, FreeDOS, Gentoo, GParted, gNewSense, Hiren's Boot CD, noppix, KolibriOS, Kubuntu , Linux Mint, OpenSUSE , ReactOS, rEFInd, Slackware, Tails, Trinity Rescue Kit, Ubuntu, Ultimate Boot CD, Windows XP (SP2, SP3), Windows Server 2003 R2, Windows Vista, Windows 7, Windows 8, Windows 8.1, Windows 10 and many more.

If you face any problem, you can write about it in the comments

Share:

Enable the Administrator account using the Local Users and Groups Manager

Enable the Administrator account using the Local Users and Groups Manager

1. Press Windows key+R to open the Run dialog box.

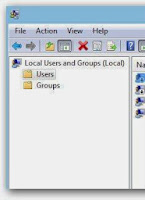
2. In it, type lusrmgr.msc and press Enter. This will start the Local Users and Groups Manager. 

3. In the Local Users and Groups Manager, click on Users in the left hand pane.

4. Then, in the work area on the right side, double click on Administrator.

5. In the following dialog box, uncheck the Account is disabled option and click OK.

6. Administrator account will be immediately available on the login screen. 

To disable the Administrator account, check the "Account is disabled" option in step 5.

This method will only work if you are using Professional or Enterprise editions of Windows 7, Windows 8(.1) and Windows 10. If you are using home and basic versions of these operating systems, this method will not work for you as Local Users and Groups manager is not available on them.

Enable or Disable the Administrator account using the Local Security Policy Editor

1. Press Windows key+R to open the Run dialog box. 


2. Type secpol.msc and press Enter. This will start the Local Security Policy Editor.

3. In the Local Security Policy Editor, navigate to Local Policies\Security Options.

4. In the work area on the right side, double click "Accounts: Administrator account status."

5. In the following dialog box, encircle Enable or Disable to respectively enable and disable the Administrator account.

6. Press OK. Log off to the login screen to see the Administrator account.

Local Security Policy Editor is not available on home editions of Windows.

Share:

How to Unblock Websites at School, Work, Home or Anywhere

How to Unblock Websites at S of free unbiased information. China is known to have even forced Google to filter its search results. Government censorship is not the only reason why websites are blocked. Some network administrators also prevent users from accessing certain websites which they believe are of no use in places such as schools and sometimes, even offices. In such times, you may need to access a website that is blocked. This article explains how.

Which websites are most commonly Blocked?

The most commonly blocked websites include websites about pop culture, health, medicine, women, religion and politics. Social websites are also often blocked and include the likes of Facebook, Twitter, YouTube, Pinterest, Instagram, Reddit, Digg, Hulu, LinkedIn, Tumblr, Blogger (Blogspot), MySpace, Bebo, Flickr, Yahoo! Messenger, Typepad, Technorati, StumbleUpon and Delicious. Sites like Google News, Wikipedia, Wikileaks and eBay are also blocked at certain places.

Access Blocked Websites at School, Work or Anywhere

There are many genuine reasons for which you might want to visit blocked websites at your school or office. Given below are the ways you can use to regain access to the blocked website you wish to visit. 

1. Cache method: Most search engines maintain a cache of web pages indexed by them. You can search for a website on Google , Yahoo! or Bing and click on the cached link that is given next to the result. To load the web pages more quickly, you can visit the text-only version. Since the website is provided from the search engine's servers, it can be used to overcome IP address and URL based filtering.

2. Using Google Mobile Search: For users browsing on a slow mobile internet connection, Google Mobile search removes all CSS styling and JavaScript to present a stripped down version of the web page from Google's own server. As the content is provided from Google's servers, the blockingsoftware feels that you are visiting Google, whereas in reality, you are viewing the blocked website. Go to Google Mobile Search. To visit the website of your choice, just replace tweakandtrick.com in the URL with the address of the website. Despite the name, Google Mobile Search can be accessed from your PC as well.

3. Access blocked websites with Google Translate. You can use translation service from Google to visit blocked websites. To do so, enter a language different from the website's language in the 'From' field and English in the "To" field. You can also use this method to bypass software that block websites on the basis of specific keyword mentions. Just translate the URL you wish to visit in a different language to overcome the keyword block.

4. Create a 2 layered unblocker: Go to Google Translate, open any proxy website inside it and then use that proxy website to access your blocked website. In this way, you can achieve two layered website unblocking.

5. Use RSS Readers for accessing restricted blogs: All blogs syndicate their content via RSS feeds which you can subscribe to in web based RSS readers like Feedly to access blocked content. 

6. To access a blocked website, you can enter its IP address instead of the URL in your browser's address bar. This can bypass most basic forms of website blocks. Although if the blocking software maps the IP address to the website domain, the website will still remain blocked. You can find the IP address of any website by pinging the website domain name in the Command Prompt in Windows (Terminal in other operating systems) and noting its IP address. Execute ping www.sturdytricks4u.blogspot.com in the Command Prompt to ping www.tweakandtrick.com.

7. Use IP Address to Decimal conversion: If you cannot access your blocked website by entering its IP address, you can enter the decimal equivalent of the URL's IP address to get access to it. Search Google for IP to Decimal + IP Address of the banned website and Google will convert it into decimal. Enter that into your browser's address bar and see if the blocked website opens.

8. Nyud.net: To unblock blocked websites, just add nyud.net to their URL. For example, if this blog (www.sturdytricks4u.blogspot.com) is blocked, you can visit it by going towww.sturdytricks4u.blogspot.com.nyud.net.

9. Opera Mini Simulator: Opera Mini, the mobile browser for users with a slow internet connection, can be installed on your computer. You can use this PC version to visit blocked websites as Opera Mini accesses content from Opera's servers instead of accessing it from the servers on which the website is hosted. Most websites will load through this method, although the quality of the results obtained may not be that good for JavaScript heavy websites.

10. TORTOR or The Onion Router is a free software that protects the privacy and security of its users by channeling data through multiple nodes so as to prevent the original data from being unscrambled. Although browsing through TOR is a bit slow, it is one of the most effective ways of bypassing restricted websites and protecting your privacy.

11. Proxy websites: There are many proxy websites (anonymizers) which open blocked websites on their servers and present the data to you. This hides the address of the website you are trying to visit from your internet service provider. Few popular free ones include Anonymouse and KProxy.

12. VPN software: VPN or Virtual Private Network software can be described as a tunnel under the public network that offers more anonymity than proxy websites as it also encrypts the data transferred by the blocked website thus, offering complete anonymity. Although most VPN software are available as paid software only, HotSpotShield is a popular free alternative.

13. IP hiding software: Sometimes, websites block users on a particular IP address from visiting themselves. In such cases, free IP hiding software like UltraSurf can be used to visit them. While free software offer very less features as compared to paid ones, they are still effective for overcoming most common blocks.

14. Changing DNS servers: A common way of blocking websites is preventing DNS servers from giving the locations of the blocked website's servers. In such a scenario, changing your DNS servers to those of OpenDNS or Google DNS will be your best option to get over the block. As an additional advantage, this can also increase your internet speed.

15. Edit your host files: Some malware and blocking software edit your host files and add a website's address in them to prevent you from visiting it. In such a scenario, you can edit your host file with Notepad by visiting “C:\WINDOWS\system32\drivers\etc” if C is your system drive. In Windows 10, Windows 8(.1), Windows 7, a warning from UAC might be displayed.

Share:

Connect a Laptop or Desktop Computer to a TV Easily

Connect a Laptop or Desktop Computer to a TV Easily

Suppose you wish to watch a movie or share a slide-show of pictures with your family on your PC but have a screen that leaves much to be desired. In such a situation, you can connect your computer to a television screen to allow your entire family to enjoy comfortably.

There are many ways in which you can connect your laptop/ computer to a television. However, the overall video quality will be different for different methods. You can choose which one to use based on the quality or the availability of hardware. The first step is to know what type of ports and connections your TV and computer have. If you already know the type of ports and connections available on your hardware, you can directly jump to Step 2. If not, then the different types of ports are explained in detail below:-

Different types of PC to TV connection ports
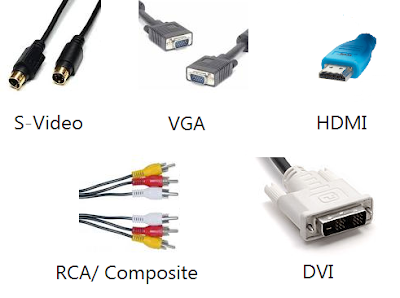
1) RCA/Composite: The oldest and the lowest quality connection available. They are the Yellow, Red and White connections most of us are familiar with. Yellow is used for composite video, white for left analog audio and red for right analog audio.

2) S-Video: S-Video or Super Video offers slightly better quality than Composite connections. As it is one of the oldest type of connections available, most televisions and computers have it. There are two types of S-Video ports, one containing 4 pins and the other containing 7 pins. This type of connection is used only for video. So you will need to connect an audio cable from your computer's headphone jack to the red and white audio inputs on your TV if you want audio to work.

3) VGA(Video Graphics Array): Most computers and televisions have a VGA port. It offers much better quality than S-Video and should be preferred if you have a HDTV. Older CRT TVs however, will not have a VGA port and will require a PC to Television converter. Just like S-Video, VGA also does not support audio and will require an additional audio cable.

Different types of connecting cables to connect computers to TVs

4) DVI: Digital Video Interface offers much better quality than VGA connections. Most laptop computers and HD TVs will have these connections. Just as the name suggest, this type of connection can be used only with digital TVs. Also like the previous two, DVI connections also require the use of an audio cable for audio to work.

5) HDMI: The highest quality connections available. Most HD TVs will have this connection, however, chances are that your computer would not. If your computer happens to have a HDMI connection port, this should be preferably used. If your computer doesn't, you can use an HDMI to DVI adapter to convert HDMI to DVI. 


Step 2: Once a common type of port between the two devices is recognized, you will need the right connector cable to physically connect them. The different types of connector cables are pictured above. If you do not find two matching types of connection ports, you will need an adapter to make the connections type match.

Step 3: After connecting the two devices, on your TV, select the external input with which your TV is connected to the computer. It may be HDMI1 or AV1 depending on how you have made the connection. This is much similar to how you select input from your DVD player.

If you have followed the steps correctly, your TV should now be displaying your computer's screen.

Important: If your computer is not recognizing the external display, you must connect the TV before starting your computer. If the picture appears distorted, you will need to change the screen resolution of your TV by altering the display settings from your computer. Most older TVs will support only one display resolution while newer TVs will support plenty of them.

Share:

Password Protect & Encrypt Files or Folders in Windows: Free

Password Protect & Encrypt Files or Folders in Windows: Free

With hackers becoming more and more sophisticated, most users are worried about the safety of their personal data. There are many options available to protect the user’s data but none comes close to encryption in terms of safety offered. This article contains some of the best and easy to use methods and tools that allow you to password protect and encrypt important files and folders in Windows without costing you anything.

Encrypting files in Windows using the Encrypting Files System (EFS)

Windows offers an inbuilt encryption method called EFS to protect sensitive data from unwanted users. EFS can be used only on hard drives formatted as NTFS and on professional and premium editions of Windows 10, Windows 8.1, Windows 8, Windows Vista or Windows XP. Home editions of Windows do not support this. 

To encrypt files with EFS, follow these steps:-

Right click on the file or folder you want to protect and click on Properties at the bottom of the menu.This will bring up the Properties window. In this window under the General tab, click onAdvanced.In the Advanced attributes window, tick on Encrypt contents to secure data option.Click OK and Apply.If the file is encrypted successfully, its name will generally be visible in green font.

If you encrypt files and folders with EFS, it would not change how you access those files and folders. You would still be able to read, modify and delete those files as long as you are logged into the user account that encrypted those files. However, other users from would not be able to do this. For example, if you carry the encrypted file in a flash drive, you would not be able to access it from other computers. To access it from other computers, you will need your encryption key.

Make sure that you backup your encryption key when Windows prompts you to do so. It will be required in case you want to access the encrypted files from a different user account or from a different computer.

To back up your encryption key, click on the Back up now option in the pop up that comes when you first encrypt a file or folder. Then, click Next on the window titled Certificate Export Wizard. Enter a password for your certificate (make sure it is tough but also easy to remember), choose a location to save it, give it a name and click Finish

In case Windows does not prompt you to back up your encryption key, you can back it up from theFile Encryption Certificates manager. Since, EFS relies on your user account to give access to protected files, it is important to choose a strong password for your Windows user account.

EFS is relatively quick and hassle free but not totally secure as Windows stores an unencrypted version of protected files in the temporary folder (when you access them) which can be easily accessed by any experienced computer user. To overcome this weakness, ensure that you clean up your temporary files with the Disk Cleanup utility every time you access your protected files.

BitLocker

BitLocker is a Windows utility that allows you to encrypt hard drives and removable storage devices. BitLocker also uses EFS mentioned above with a minor difference. It encrypts the entire drive instead of encrypting individual files and folders. 

With BitLocker too, you wouldn’t notice much difference while using your computer but if anyone else tries to access them on a different computer, he will be shown a screen asking the password. BitLocker To Go can be used to encrypt removable flash drives as well. BitLocker too depends on the safety of your Windows user account to ensure that files remain private. Hence, it is extremely important to use a strong Windows password.

BitLocker can be turned on in the Control Panel. BitLocker only works on devices having TPM. In case your PC does not have TPM, you will get an error saying “This device can’t use a Trusted Platform Module.” TPM is a special circuit that’s built onto the motherboards of BitLocker compatible computers.

BitLocker is only available on Professional editions of Windows.

7ZIP

7Zip is a free and open source compression utility that has the option of allowing users to create a password protected archive. The encryption offered by 7Zip is AES-256 (AES stands for Advanced Encryption Standard), which is virtually impossible to crack and used by everyone from giant tech companies to your next door IT expert. 

7Zip can also allow you to encrypt the file names in the archive so that no one without the right password has a clue as to what is present inside the protected archive.

To encrypt files and folders with 7Zip, either create a new password protected archive from the 7Zip file manager or simply right click on the folder or file you want to protect and select “Add to archive” from the 7zip sub-menu.

You can choose either 7Zip’s .7z or .zip format. If you use .zip format, an additional encryption method called ZipCrypto is available, which is also good but not as secure as AES-256. Also, if you use a .zip archive, you cannot encrypt file names.

7Zip supports multiple platforms, is easy to use and also very fast when it comes to creating and extracting archives.

VeraCrypt

VeraCrypt is a fork of and successor to the extremely popular and discontinued encryption software TrueCrypt. VeraCrypt claims to have removed the issues that were raised while security auditing TrueCrypt. It supports Microsoft Windows, Mac OS X and Linux.

Like TrueCrypt, VeraCrypt is completely free and supports AES, Serpent and TwoFish encryption ciphers. VeraCrypt is simple to use and offers very fast encryption process. VeraCrypt also allows a single hidden volume to be created within another volume. The Windows version of VeraCrypt can be used to create and run a hidden encrypted operating system. The best part about this software is that its code is available for review and the developers claim an individual security audit is being planned.

Important Tips:

It is important to note that there are several tools and utilities available in the market that allow you to break encryption and passwords. The programs mentioned above will keep your data safe from a large majority of such tools but they, like all methods of encryption are not infallible.Even if you encrypt a file, it can still be deleted. So, be sure to back up your encrypted files.Make sure that you use a memorable password and keep your encryption key safe to prevent you from losing access to your encrypted files.

Share:

MAKE YOUR COMPUTER WELCOME YOU

Make your Computer Welcome You

Do you watch movies? Have you always loved the way how Computers in movies welcome their users by calling out their names? I bet that you too would want to know how you can achieve similar results on your PC and have a computer said welcome. 

Then you are at the right place, this article describes exactly how you can make your computer welcome you like this.

With this trick, you can make your Computer welcome you in its computerized voice. You can make your Windows based computer say "Welcome to your PC, Username."

Make Windows Greet you with a Custom Voice Message at Startup

To use this trick, follow the instructions given below:-

Click on Start. Navigate to All Programs, Accessories and Notepad.Copy and paste the exact code given below.

Dim speaks, speech
speaks="Welcome to your PC, Username"
Set speech=CreateObject("sapi.spvoice")
speech.Speak speaks


     3.  Replace Username with your own name
     4.  Click on File Menu, Save As, select All Types in Save as Type option, and save the file as Welcome.vbs or "*.vbs".
     5.  Copy the saved file. 
     6.  Navigate to C:\Documents and Settings\All Users\Start Menu\Programs\Startup (in Windows XP) and to C:\Users\ {User-Name}\AppData\Roaming\Microsoft\Windows\Start Menu\Programs\Startup (in Windows 8, Windows 7 and Windows Vista) if C: is your System drive. AppData is a hidden folder. So, you will need to select showing hidden folders in Folder options to locate it.
     7.  Paste the file.

Now when the next time you start your computer, Windows will welcome you in its own computerized voice. 

Note: For best results, it is recommended to change sound scheme to No Sounds.
You can change the sound scheme to No Sounds by following the steps given below:-
Go to Control Panel.Then click on Switch to Classic View.Then Click on Sounds and Audio Devices.Then Click on the Sounds Tab.Select No Sounds from the Sound Scheme option.If you wish to save your Previous Sound Scheme, you can save it by clicking Yes in the popup menu.Click on OK.

Try it yourself to see how it works. In my personal opinion, this is an excellent trick. Whenever I start my PC in front of anybody and the PC welcomes me, the fellow is left wondering how brilliant a computer do I have.

Share:

Friday, 3 June 2016

FREE CALLING APP

Hello friends sturdy is back again with this interesting post.
Some people have problem of mobile balance. That's why I am going to helping you by this app name - Nanu       
Using nanu app you can call to anyone in free. It works in good network/WiFi connection.
                                                THANKS
                                                       &
                                                 ENJOY
                                     

Share:

Thursday, 2 June 2016

ANDROID TIPS AND TRICKS

10 Android Tips and Tricks :~

Hello friends sturdy is going to post an article with secret android tricks and hidden features of android phones. Different versions of android versions support different set of android tricks, so try them all

1) Force reboot:

Many times android users face a problem of freezing in mobile phone, in case your android phone is frozen, you can reboot it: Just press Power Button+ Home Key + Volume up button simultaneously.

2) Bypass Applock in android:

1. Take the target phone in which you want to hack AppLock.

2. Now go to settings and then tap on Apps or Applications.

3. You will see AppLock app under downloaded section and tap on it.

4. After that tap on Force stop option. With this AppLock application is currently in idle state. You can open locked apps with out entering password.

3) Quick Google Access:

Android users don’t know that android phones provide a way by which we can access Google search in just a single click: Press menu key and hold it for couple of seconds, it will launch the Google search

4) Reboot Android in safe mode:

To reboot your android in safe mode, follow the below given instructions. *Long press the power button *Long press on the power off option. Android phone will show a confirmation message about rebooting it in safe mode.

6) Move android apps to SD card:

Its good idea to install android apps in SD card, but what if you installed apps on your phone memory. Don’t worry! Android phones provide a way by which we can move our apps to SD card. To move apps to SD card, follow these steps: Go to settings > Application settings > Manage application > Select the application, You will see the option “Move to SD card”.

7)Hard Reset your android phone:

To hard reset a phone dial *2767*3855#, this will delete all the data as well as settings of android phone. Don’t try this code for testing purpose, until you are not sure. It will not ask for any confirmation.

8) Context menu in android:

Long press on the screen, will show you additional options for customizing android phones. This context menu is somewhat similar to the right click menu of most operating systems.

9) Taking screen shots on android phone

Android phones offer a great feature by which we can take the screen shot without using any 3rd party application. However the screen shot android tricks vary from one android version to another version. Press the Home button + power button. For Galaxy Nexus: Power button + volume down button. For Galaxy Note 2 and S3: Swipe your palm on the screen to take screen shot.

10) Android Version Animation:

Go to settings > about phone > Tab repeatedly on ‘Android version’. After sometime, the Android version will be animated

Share:

Popular Posts

Text Widget


Enjoy

THANK YOU FOR VISITING


Hello friends ! This is Sourav .... Welcome in my world......✌✌

Copyright powered by sturdy or..... Powered by Blogger.

Featured post of sturdy

How To Add All Facebook Friends In One Group - Full Script

How To Add All Facebook Friends In One Group - Full Script Hello my friends today we are here to share an awesome trick which will help you...

Contact Form

Name

Email *

Message *

Translate

Translate

Images

Search This Blog With Sturdy

Who is the best?

Popular Posts